The Murania “One Transistor” Boy’s Radio Kit

INTRODUCTION & CONSTRUCTION

The Four State QRP Group (Oklahoma – Kansas – Arkansas – Missouri, in case you were wondering), founded in 2003, is one of the best developers and retailers of high quality and reasonably priced QRP (low power) ham radio and other do it yourself electronics kits.

I have a few of their kits over the past few years, most recently including the Bayou Jumper Paraset transceiver last year. I presently have the NM0S 4S-Tuner/Antenna Coupler kit on order.

Tonight I tackled one of their popular new non-ham radio kits, the Murania, a one transistor Tuned Radio Frequency (TRF) AM broadcast band receiver kit. The kit was designed by NM0S, David Cripe, who has engineered several of the 4SQRP kits.

The documentation for the Murania tells of the advent of transistor radios in the 1950s and how radios with 1 or 2 transistors were considered toys and therefore not taxed like radios containing more transistors. These 2 or less transistor “toy” radios became known as “Boy’s Radios” and are highly collectible today.

The designers of Boy’s Radios employed some creative design techniques to maximize the performance of these minimalist circuits, with sometimes amazing results. The Murania kit was inspired the design of those simple high performing transistor radios.

Unpacking the Murania kit.

My Murania kit arrived quickly within 2 days of placing my order online….WOW!

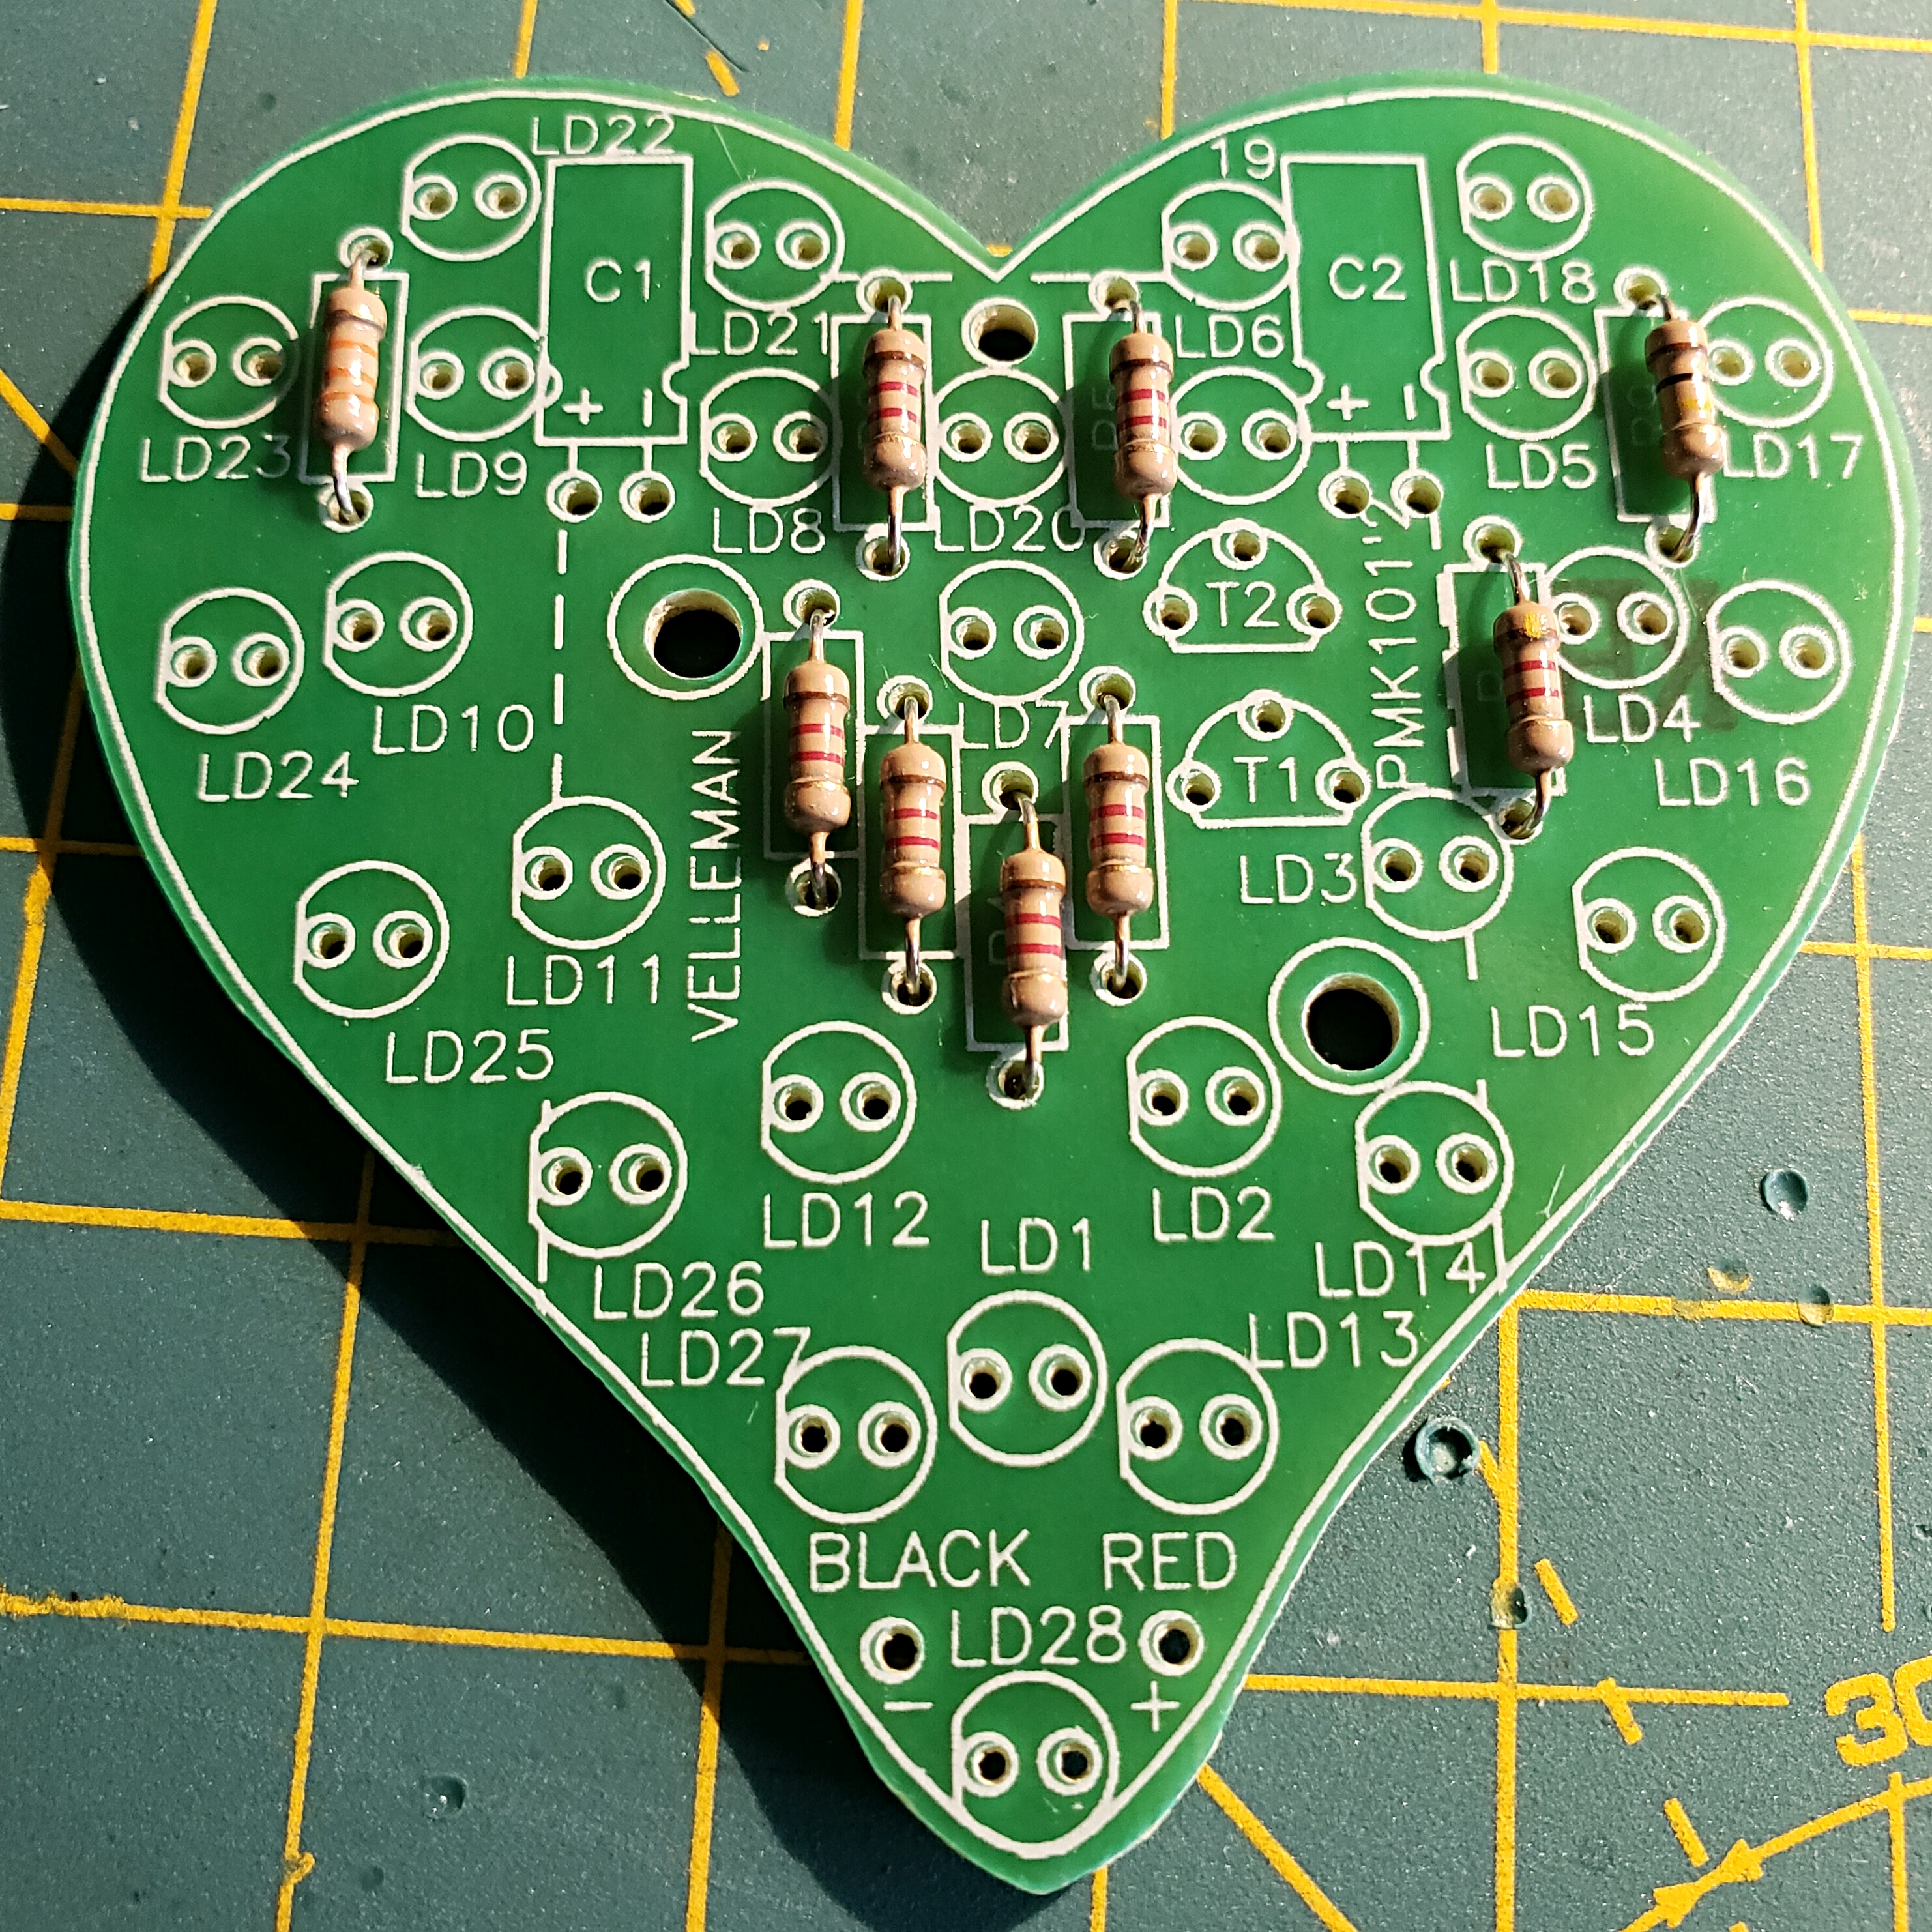
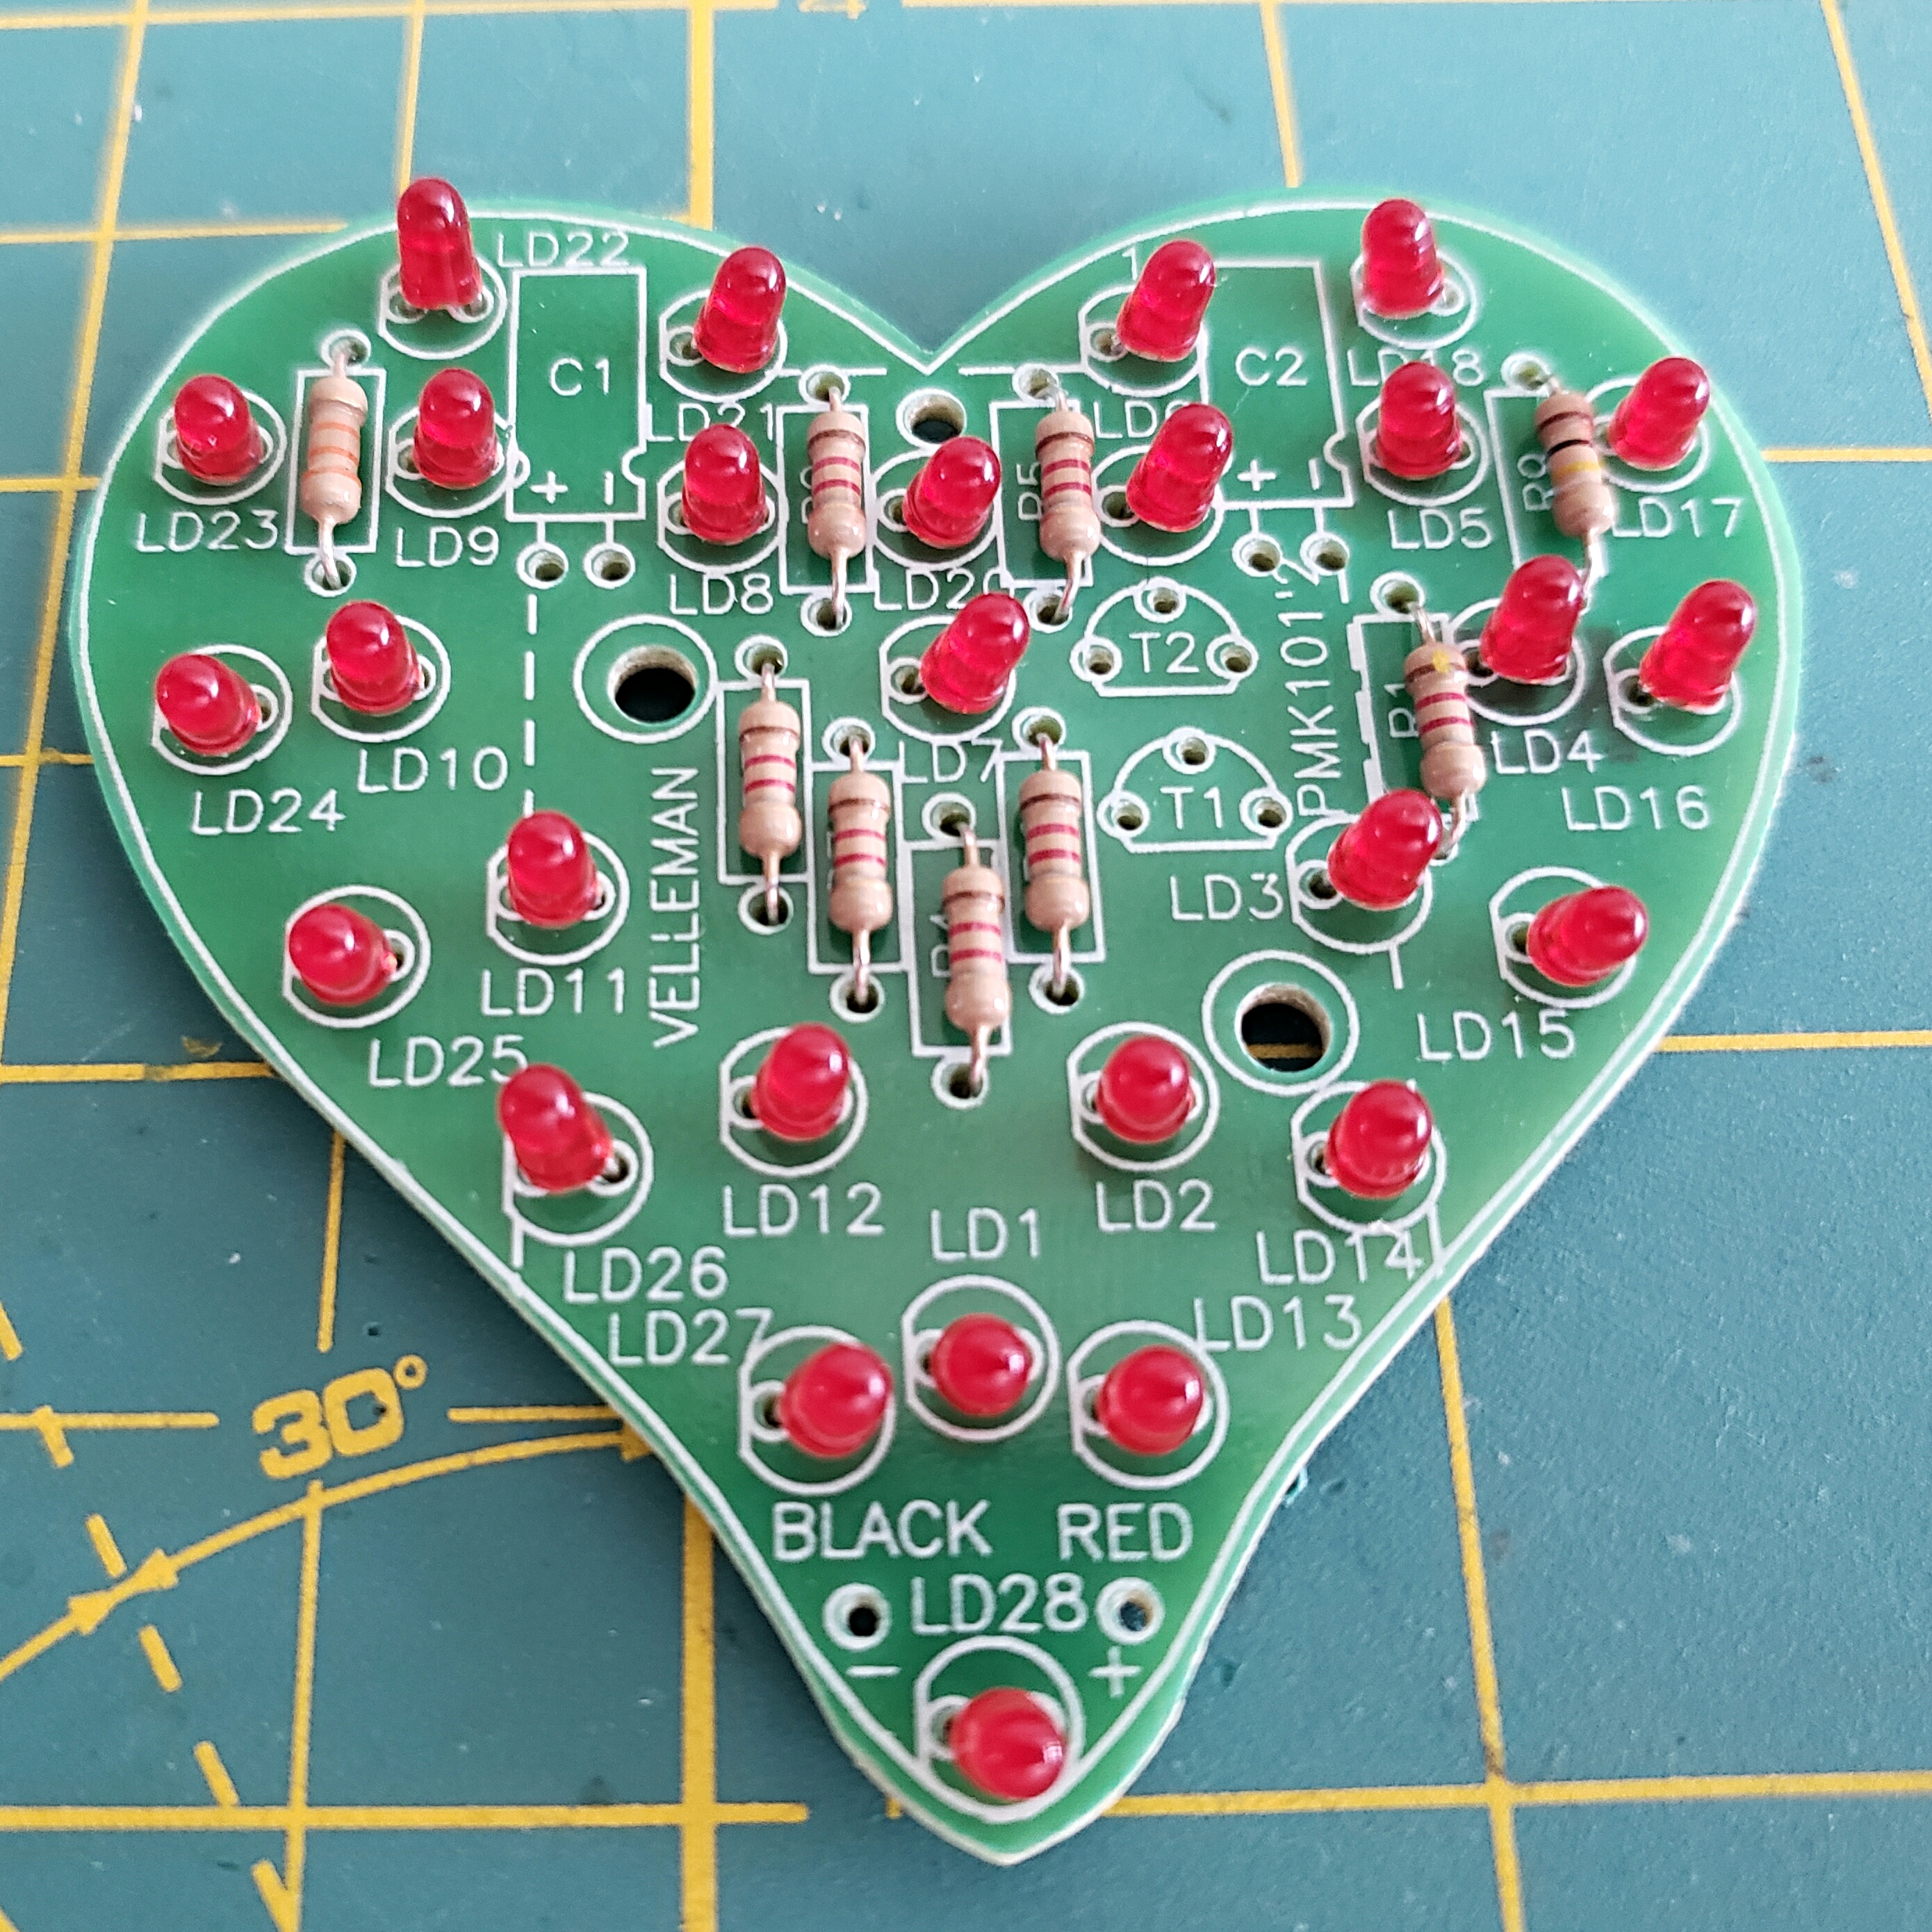
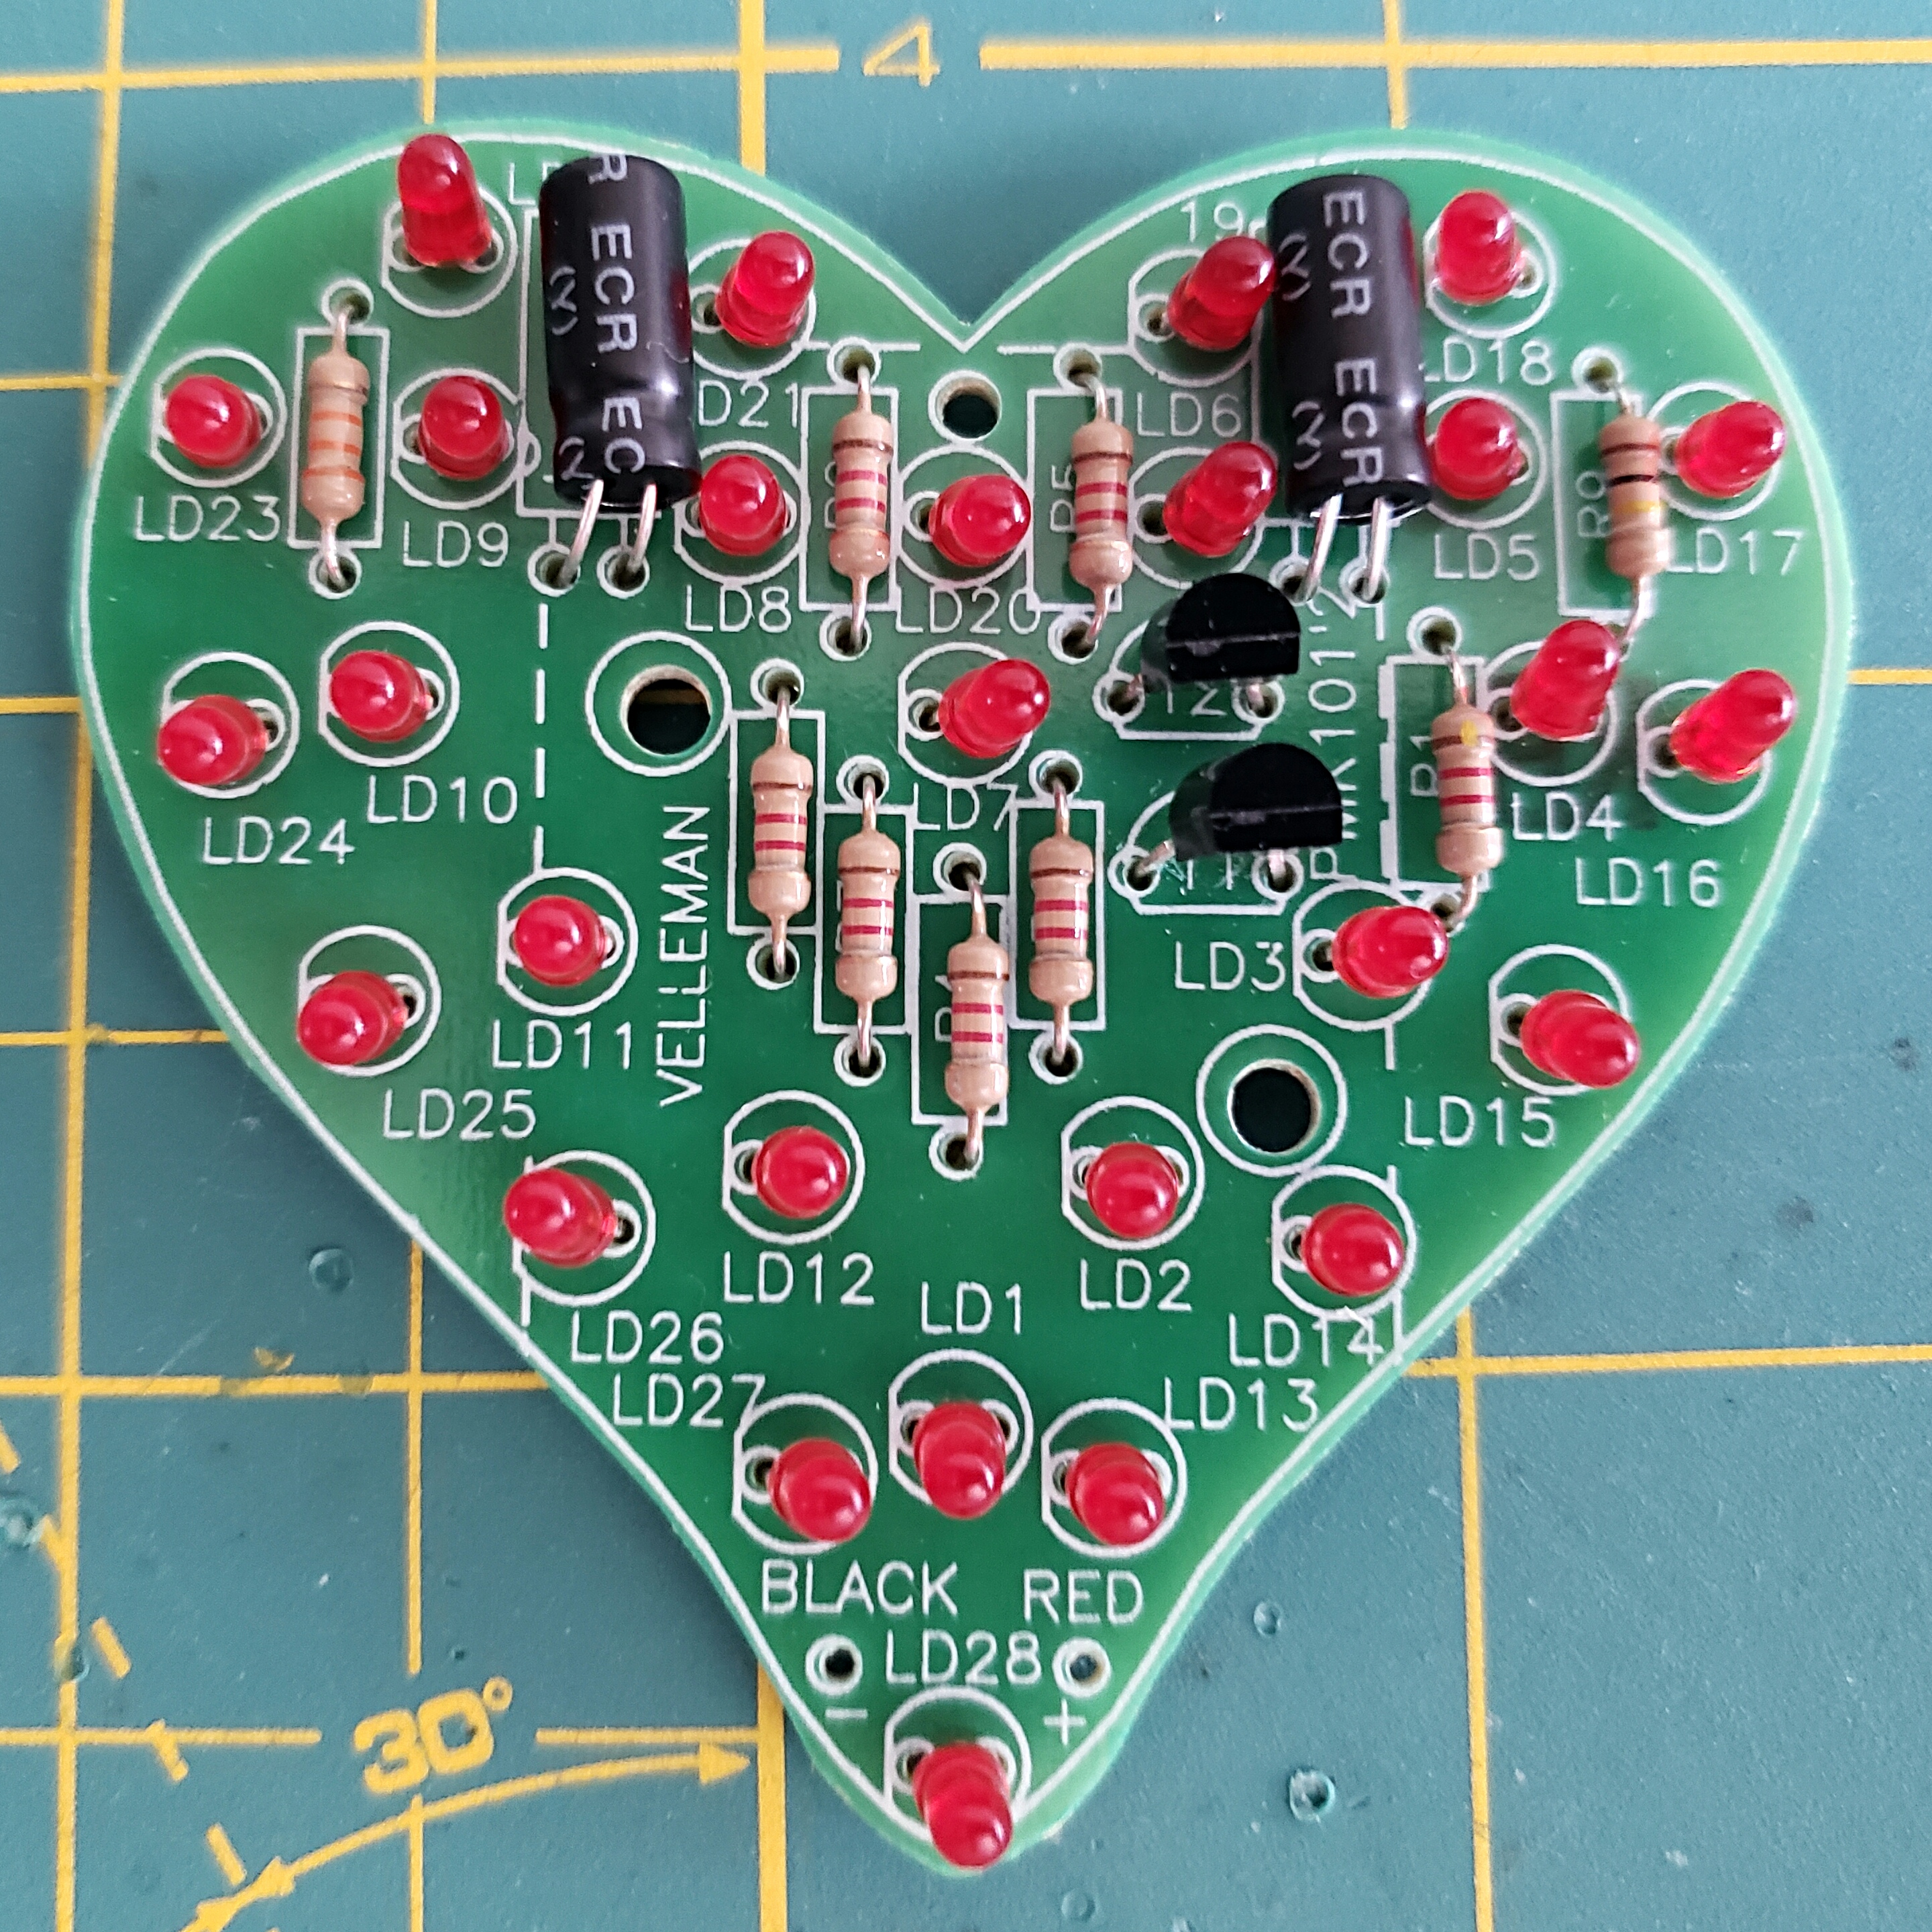
The Murania features a unique construction technique called “Pittsburgh Construction” developed by W0MQY , Joe Porter, in which components are soldered to the surface of pads on a silk screened double sided PCB.

Like other 4SQRP kits, the assembly manual needs to be downloaded from their website. Documentation is very good with clearly expressed step by step directions, but lacks pictures which might be helpful in illustrating potentially confusing steps for the newbie builder, such as the correct orientation of a polarized component such as an LED, diode or electrolytic cap.

The 4SQRP website suggest the kit can be built in about 2 hours time, and that was my experience. The radio is built in five stages… (1) wind the coil, (2) build the voltage regulator, (3) build the audio amp, (4) build the RF circuit, (5) final assembly.

1. Winding the Coil

The first task is to wind the coil which consists of 37 turns of No. 22 AWG enamel wire around a ferrite core. The instructions call for covering the core with a layer of masking tape first and using masking tape to hold the first and last winding in place.

My first attempt at
winding the coil.

I chose to use black electrical tape, and that was definitely a mistake – the electrical tape made it difficult to compress each winding snug against the previous winding and it didn’t do a very good job of holding the first and last winding in place.

I believe this may have also affected performance of my radio (see below). I am planning on modding the set and rewinding the coil with 61 turns (also, see below) and will use the recommended masking tape at that time.

2. Voltage Regulator

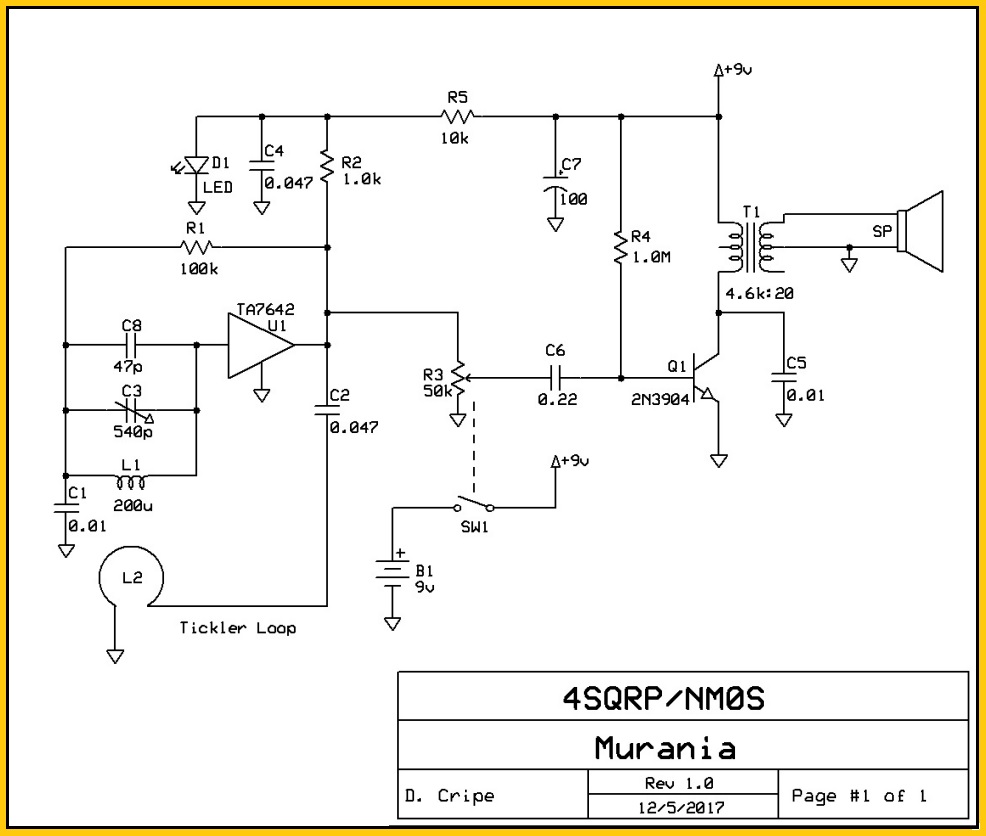
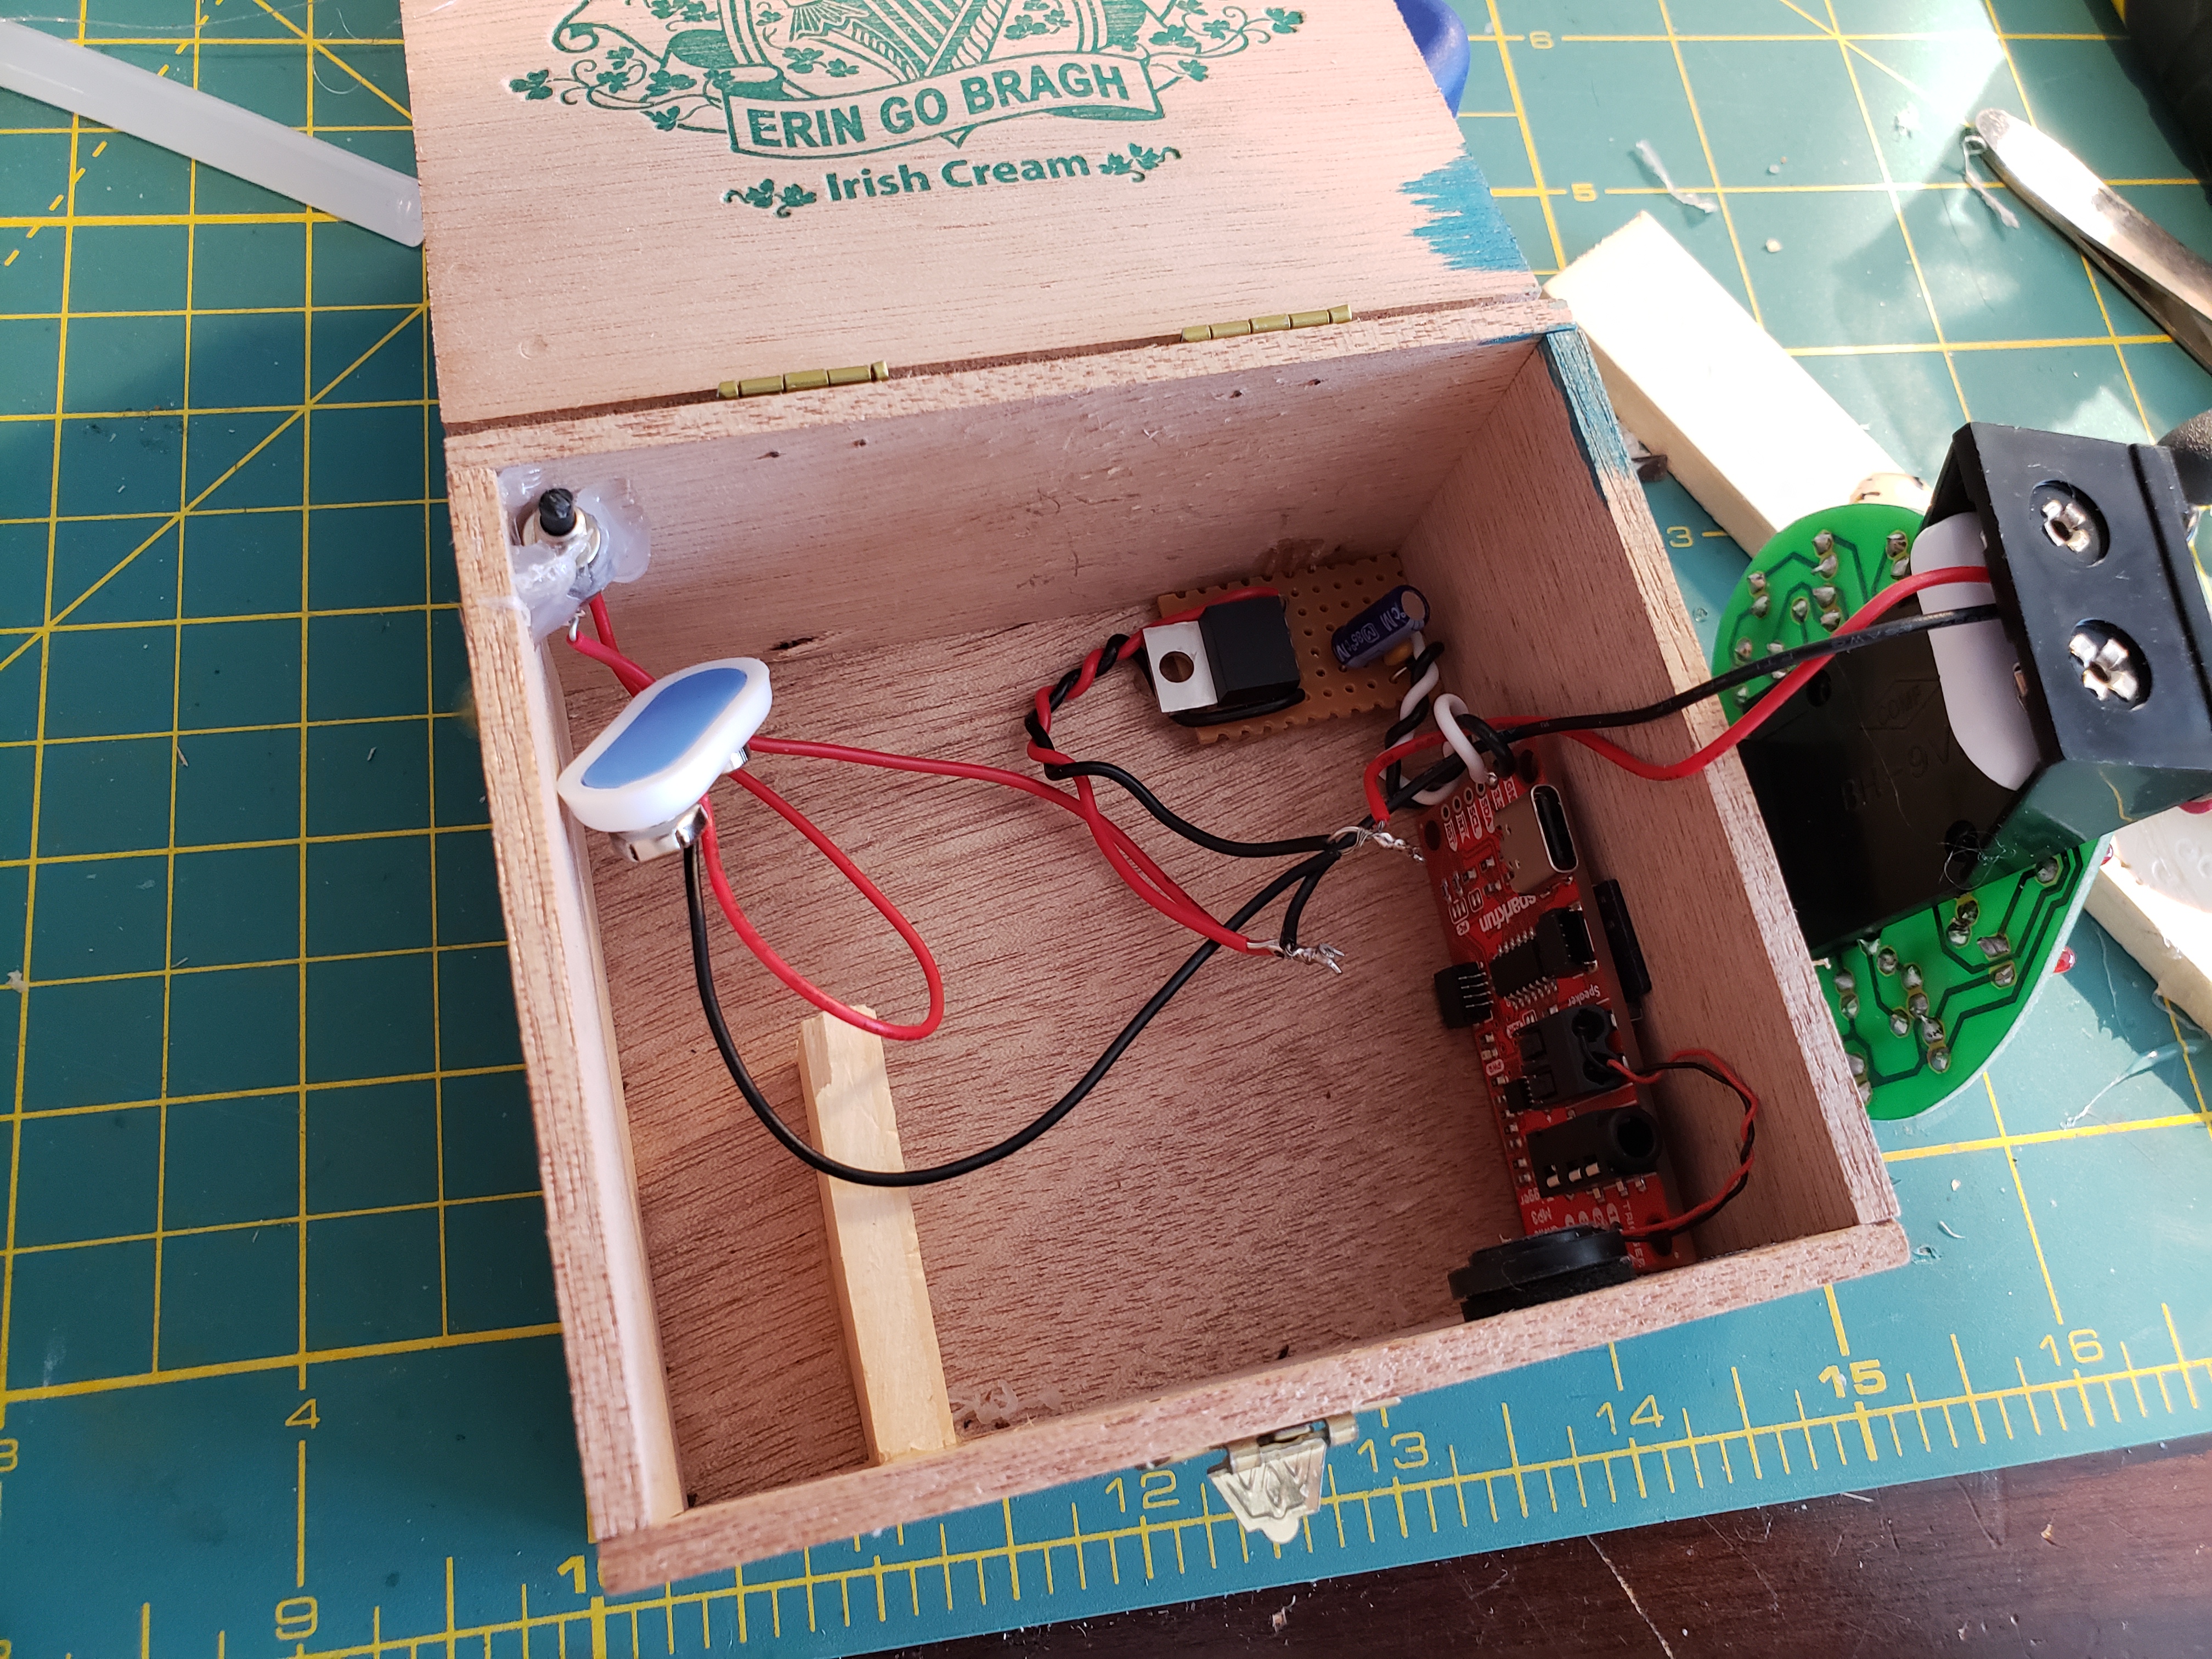
The first circuit constructed is the power supply/voltage regulator which consists of installing the volume control pot and attached power switch, one electrolytic capacitor, the battery connector, another capacitor and a resistor and the LED which serves three functions – power on lamp, signal strength indicator, and voltage regulator delivering 1.6 – 1.8 +VDC to power the radio.

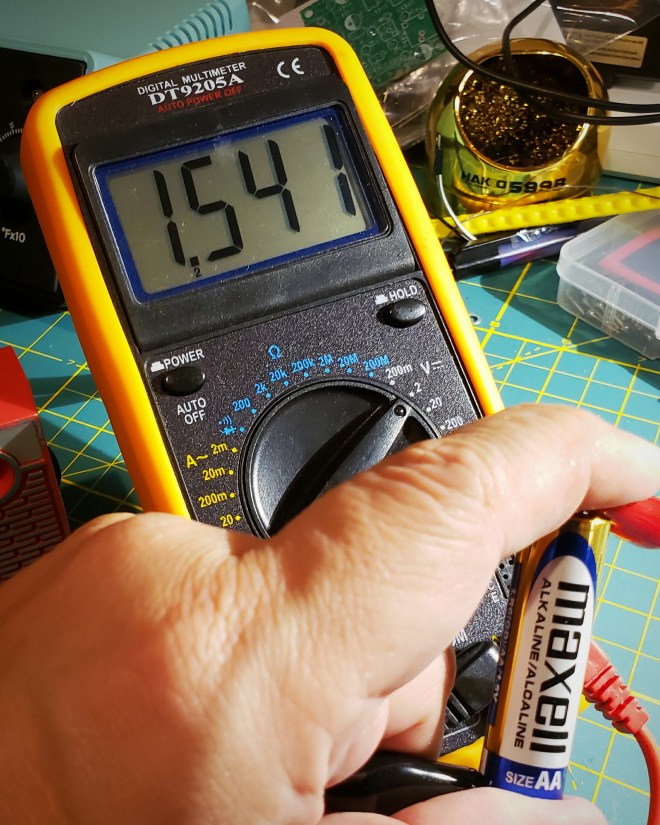
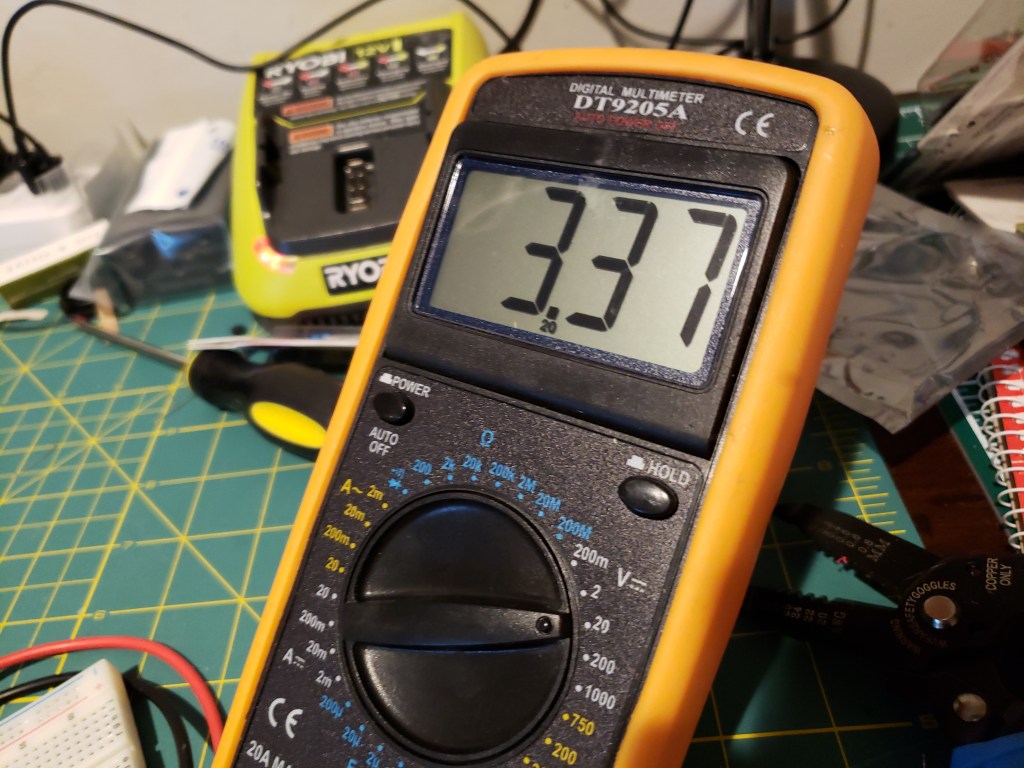
I appreciated that the instructions called for testing the voltage regulator circuit before proceeding on to the audio amp stage. My Murania was putting out 1.792 VDC+ within the acceptable range of 1.6 – 1.8 volts.

3. Audio Amplifier

The Murania has a single stage of audio amplification based on the 2N3904 NPN transistor that drives the speaker through a matching transformer.

Other components in the stage included a pair of capacitors, a single resistor and of course, the transformer and speaker.

4. RF Stage

The bulk of the RF work is handled by a single IC, the TA7642, which has its origins in the late 1960s. Equivalent to the ZN914 and MK484, the TA7642 contains ten transistors and performs the task of RF amplification, audio detection, and automatic gain control. The documentation points out that with the TA7642, it is possible to construct a Tuned Radio Frequency receiver with useful sensitivity and selectivity, using only a handful of components and that this device served as the basis of many radio receivers that were the successors to the Boy’s Radios.

The 10 transistor equivalent circuit of the TA7642 per the datasheet.


Like the voltage regulator and audio amplification stages the RF stage went together without a hitch. All parts in the kit were properly identified and clearly referenced in the assembly manual. The etching on the circuit board made mis-installation pretty much an impossibility if you’re paying attention to what you’re doing.

The assembled Murania TRF radio ready for testing.

5. Final Assembly

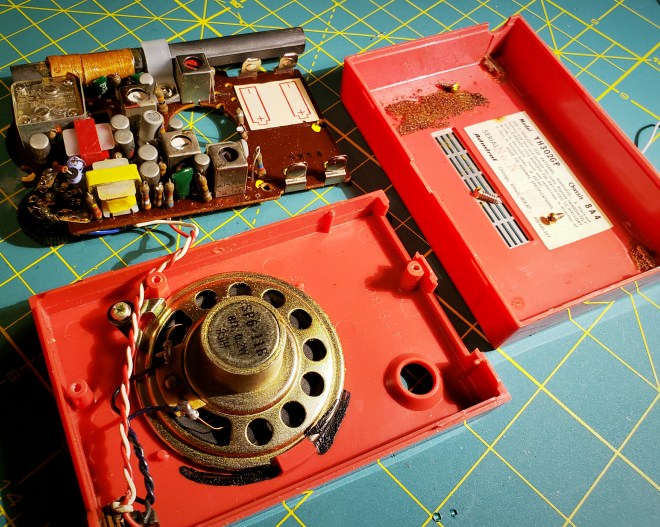
After testing the radio to make sure it works (it did), the last step was to assemble the rest of the cabinet which is comprised of five additional pieces of yellow PCB material with pads strategically placed to match up for soldering to connect.

The pieces fit together perfectly, although I should have taken time as recommended in the directions to file off burs and rough spots so the pieces fit together more perfectly. Overall this is a pretty ingenious way to build a radio cabinet.
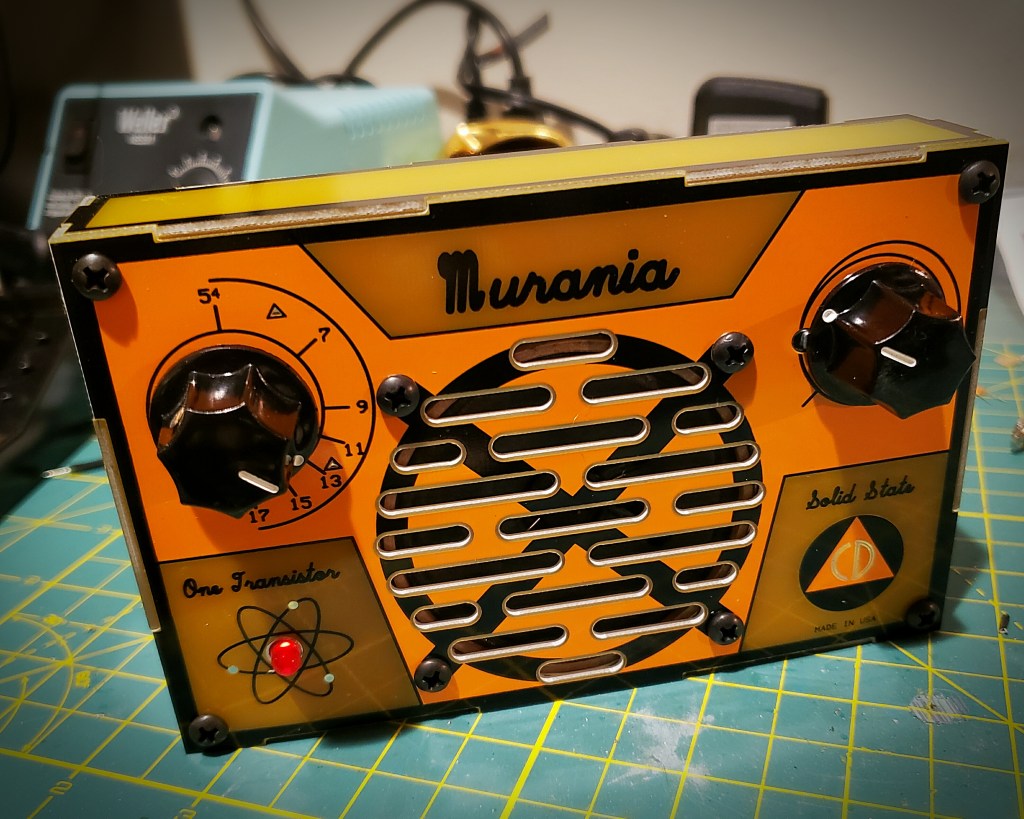
PERFORMANCE AND MODS

I was very pleased that the radio worked right away. I was able to pick up several AM stations with ease. Stations received were clear and the audio, while not as loud as I would have liked, was not distorted.

One problem I did encounter that is worth mentioning is that after I tested the radio on my bench I attached the back to the radio and brought it to my wife to show off my handiwork.

She was impressed, however when she turned the radio on, the LED lit up but there was no sound coming from the speaker – absolute silence – UGH!

I took the back off and quickly diagnosed the problem – the top of the 9V battery was shorting the speaker terminals – a problem easily fixed with a piece of electrical tape across the speaker terminals.

I did expect the radio to be a little more sensitive than it was initially and I realized that the radio’s performance might have been inhibited by my sloppy coil winding.

The unmodified Murania Schematic ©NM0S, 4SQRP Group

Online I found a list of three simple mods for the radio published by Jim Marco, WB2LHP in MI, the third of which that involves additional windings on the coil so I thought I’d give them a try.

Here are Jim’s mods…

1. Detector Gain Control…

FLOAT the wiper lug of R3 and place a jumper between the PADS for the R3 wiper and the high side of R3.

Lift the leg of R1 that intersects with R2 and R3 and connect a jumper between the floated leg of R1 and the wiper of R3.

According to Jim, this allows R3 to control the gain of the detector stage in the TA7642 acting similar to a regen control where there is both volume and gain reaction. The audio amp runs wide open and R3 should be adjusted for the best sounding audio.

2. Reduced audio distortion…

Changing R2 from 1K to 2.7K biases the output stage of the TA7642 for linear operation.

3.Frequency coverage and dial mapping…

Increasing L1 from 37 turns to 61 turns and removing C8 centers the frequency coverage and makes the dial tracking spot on…

The revised schematic based on WB2LHB’s mods

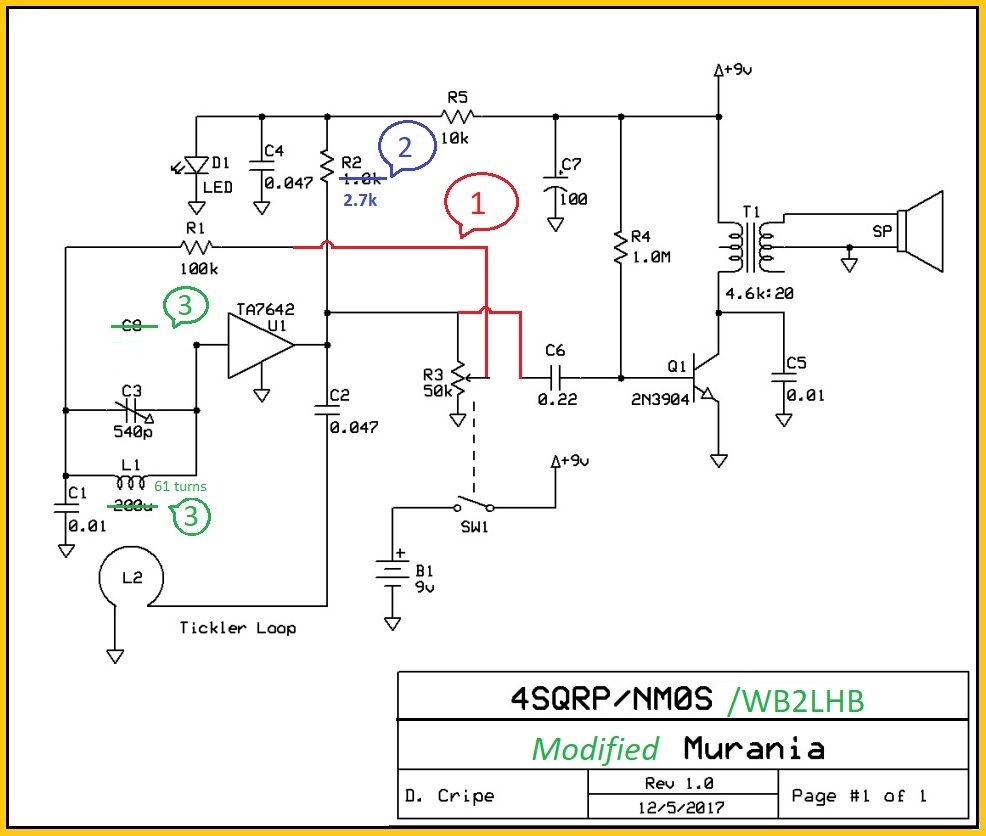
I am pleased to say that the mods were easy to accomplish and I had no difficulty with any of them. I did not have a 2.7K ohm resistor on hand so I tied a 2.2k and a 470 ohm resistor in series for R2. Using the recommended masking tape instead of rubbery electrical tape on the ferrite rod made a world of difference too – winding the 61 turns was a snap.

My modified Murania – notice the new ferrite coil, the replacement of R2, the removal of C8 on the right, and the jumper going from R1 over the speaker to the VR R3.

And how did it work? Even better than before – the radio seems to be more sensitive and is picking up more stations and the audio is definitely more crisp as promised. If you’re looking for a fun one-evening project that will take you back to your earlier days of melting solder – the Murania TRF receiver is worth building.

©2019 JMSurprenant

Cohiba Behike 56 Cigar Review

My dear wife Ellen returned from spring break in the Dominican Republic with her college girl friends last week with some wonderful gifts for me – a box of 25 Cohiba Siglo IV cigars – and – two Behike 56 cigars. No man ever married better than I, as last year she returned with some Cohiba sticks as well as a box of Romeo Y Julietta cigars.

I know that I should have kept both of the Behikes in my humidor to save for a special occasion, but I simply could not wait to try this, Cohiba’s most legendary ultra-luxury, highly rated and greatly desired cigar brand.

So yesterday afternoon found me at my favorite local cigar bar, The Owl Shop in New Haven, Behike in tow, to meet up with my good friend Carl J. Frano for a Sunday afternoon cigar and a whisky.

As the Behike is a good two notches above my typical smoke, I reckoned it was right to pair it with something a bit more upscale than my go-to double Jack on the rocks. I chose Laphroaig 10 year old single malt, and in retrospect, it was a good choice.

About the Behike

The Cohiba Behike BHK line was launched in early 2010 and is a limited production stick. It comes in three sizes – the BHK 52 is the smallest at 4 3/4 inches by 52 ring gauge, the BHK 54 is the middle child at 5 3/4 inches long by 54 ring and BHK 56 is the big boy Toro at 6 1/2 inches by 56 ring.

What places the Behike above the other Cohiba cigars is the medio tiempo leaf which comes from the two top leaves of the tobacco plant which gathers more sunlight and contributes significantly to the flavor and the limited quantities.

My Experience

The Behike 56 was beautifully crafted, featuring a very neat triple cap with pigtail, a noticeable spiral seam, some slight leaf veins throughout. The cigar was nicely packed and firm from foot to cap. It felt glorious in my hand.

I cut the cap and savored the delicious cold draw. The predominant note was earthy barnyard grass and cedar with a slight hint of cocoa. The cold draw was milder than I had anticipated, but very pleasant. I did not rush to light the cigar.

My Behike 56 and a double of Laphroaig 10 at the Owl Shop

First Third

I found the draw to be a little tighter than anticipated but not bad by any stretch. Flavor notes were mild earth and cedar and mild spice too. Not overwhelming but not underwhelming either. Many of the other reviews I read fault the 56 as being a little milder than the BHK 54 and 52, due to its size. While I haven’t sampled the 56’s little brothers and am not likely to anytime soon, I would say that the 56 was definitely mild.

The burn was excellent, very straight and the cigar produced a nice firm salt and pepper ash that hung on to about the inch and a half mark.

Towards the end of the first third, I picked up on some mild nuttiness.

A straight burn line and firm ash was consistent from the first third to the finish.

Second Third

The flavor notes of the second third did not change appreciably from the first, and that wasn’t a bad thing at all. Again there was a mild cedar or leather flavor, some mild spice (black pepper) and a hint of sweetness, perhaps cocoa. The flavor, though mild, was very pleasant and very smooth overall. I did pick up on some creaminess developing around the midpoint of the cigar.

The burn continued to be excellent and the draw, which I previously noted as a bit tight initially, was good throughout the middle third.

In to the second third – mild and flavorful

Final Third

In my experience, the flavor profile of the Cohiba Behike 56 was nothing if not consistent. I didn’t notice any new notes as I smoked my way through the final third – I would say the cigar was a bit creamier at the start of the last third.

I did note that the overall taste, which was pretty mild, got much more intense in the last half of the last third. It wan’t unpleasant, but the flavor intensity was increased and noticeable.

Burn and draw remained excellent right to the very end. Total smoking time was 2 hours and 15 minutes.

Delicious to the very end.

Overall

What can I say about this cigar that more experienced reviewers haven’t said before? Clearly this was the finest cigar I’ve ever had the privilege to smoke, and I totally get why it fetches such a premium price.

This cigar was simply delicious all the way through. The one word that would best summarize my overall impression would be ‘smooth.’

If you have the opportunity to smoke a BHK 56, I don’t think you’re going to be disappointed. Perhaps the 54 or 52 might be a better choice as they are purported to have a more intense flavor profile.

I look forward to saving my other Behike 56 in the humidor for a special occasion. Clearly a 10/10 smoke, anyway you slice it.

©2019 JMSurprenant

NEARC-NEVEC RADIO 50

This past weekend I attended the New England Antique Radio Club NEVEC “RADIO 50” Expo and flea market at the Courtyard by Marriott Nashua. As a member of NEARC, I have attended this, the premiere vintage radio show in the region for several years. It is easily the high point of my entire winter and once again this year it did not disappoint.

The event draws vendors from all over the northeast and every year I love seeing the elusive rare radios that I have long desired but are beyond my means. Rarities spotted this year included a couple of pioneering compact Bakelite AC/DC Kadette sets as well as a space age Philco Predicta Princess television.

Going to NEARC every March has become a tradition for me and part of the fun is seeing the same good friends who aren’t local to me anymore. These include my best friend, Alan, who first introduced me to the NEARC show about a dozen years ago when we were first getting to know each other, and Larry and Andre – two high school buddies (CCHS ’83) – who now on the cusp of old age like me, are taking comfort in the company of other ancient things.

I never travel to Nashua intending to spend (much) money as I have a basement chock full of ongoing (read: largely ignored and/or abandoned) projects, yet once again this year I still managed to part with about $100 of my dollars.

I spent the most of my dollars at WJOE’s table – again. WJOE is my go-to guy for capacitor kits and other radio restoration small parts. His website is also an excellent resource, but it’s always fun to transact business in person. This year, WJOE sold me:

  • a Realistic FM-AM Radio 8 Track Stereo Player Model 14-908A, restored, complete and functional,
  • a 300 piece box of ceramic capacitors, and
  • a Chinese 40M QRP PIXIE type XCVR kit (subject of a future blog post)
The Realistic FM-AM Radio 8 Track Stereo Player
MODEL 14-908A

I also picked up a nifty Admiral model YH302GP 8 transistor portable radio (1965) from Garysradios.com and three used LPs:

  • The Who, “Live at Leeds”
  • The Who, “Who by Numbers”
  • John Mayall, “The Turning Point”
The Admiral 8 Transistor Radio I bought from Garysradios.com

I wasn’t looking for new projects and was very happy that both the 8-Track player and the Admiral transistor radio were both sold fully functional, serviced and ready to enjoy. Of course that situation didn’t last long because I managed to drop and kill the Admiral 8 transistor before I even left the flea market!

Inexpensive 1960s era plastic housed electronic devices were never known for their durability. Both the plastic casing and the circuit boards were extremely brittle by today’s standards and one drop typically means serious damage or more likely, a dead radio. Fortunately the Admiral’s case survived my drop without any damage but the radio itself, which was previously playing perfectly, was now completely dead.

Last night I opened the Admiral up on the workbench to troubleshoot the problem. I was guessing I might find a cracked circuit board and with any luck I’d be able to bridge any broken traces to get the radio to play again.

I started by testing the two AA batteries that came with the radio and as suspected, they both checked out fine…

I next examined the circuit board looking for a crack or other obvious physical damage, and I immediately spotted the problem. There was a broken resistor located between the speaker magnet and the battery clip. Apparently the impact of the drop caused the battery to collide with the resistor and break it in half.

So this was going to be an easy fix. Because I could still read the color code from the busted resistor (Brown – Black – Brown = 100 Ohms) I didn’t even need to reference the schematic.

I soldered in a replacement 1/4 watt 100 ohm resistor from my on hand stock and the radio returned back to life. All told the diagnosis and repair took less than a half hour to complete.

It lives again!

More scenes from RADIO 50… see you next year!

©2019 JMSurprenant

CAO America Landmark

Today while my wife was having lunch with one of her best friends in Glastonbury, Connecticut, I stopped in the Fine Cigar and Tobacco shop to kill a little time and enjoy a smoke.

The Fine Cigar Shop is a fabulous retailer, with a well stocked walk in humidor and a nice selection of humidors, torches, cutters and other supplies. It is also one of the few local tobacco shops where you will find today’s stick, The CAO America, available. It was at Fine Cigar where I discovered this less popular stick in the CAO World cigar line. I had previously smoked and enjoyed several of the other cigars in the series including the Brazilla, the Colombia, and the Italia.

The red white and blue label and gold pinstriped double wrapper make this one attractive cigar.

The America is absolutely beautiful to behold with its distinctive pinstripe barber pole wrapper and its red, white and blue band and foot band. The double wrappers are a Connecticut broad leaf Maduro and a Connecticut Shade Capa which have a nice oily dark brown appearance with some small veins. The cigar is firm from foot to cap and well packed with fillers from Nicaragua, Italy, the Dominican Republic and the United States, bound with a Brazilian binder and capped with a somewhat sloppy looking double cap.

The Landmark is a 6 x 60 Gordo and the America is also available as a 6.2 x 54 Torpedo (The Monument) and a 5.0 x 56 Robusto (The Potomac).

The cold draw was flavorful with predominant notes of dried fruit and some spice. I enjoyed the flavor of the cold draw very much, but did feel it wasn’t as potent as it could have been.

Upon lighting the America, the initial flavor noted was mild pepper, cedar and some slight nuttiness as I worked my way through the first third. The one word that I would use to describe the experience of the first third overall would be “dry.”

It was not unpleasant at all, but the flavor, though good, did not seem to be as intense as it could have been. I also noted a very slight bitterness and that the draw was somewhat loose and the burn uneven initially, needing occasional touching up with my torch to prevent canoeing.

Into the second third and the predominant flavor continued to be a mild pepper and some wood. There was a very slight creaminess noted and some nuttiness in the second third.

A mighty ash!

In researching the CAO America, I had found another review online where the reviewer described the cigar as having a ‘cardboard’ taste – definitely not a word you often see in cigar reviews, and not a word that is complimentary.

I would have to say that while I would probably not have identified this flavor on my own, once I had read this, I definitely agree that there was a certain cardboard flavor particularly in the second third. The burn evened out in the second third and the draw seemed to have tightened up a bit and was good from here on out.

The final third was not significantly different than the second third. The flavor notes remained spice, wood some nuttiness and some cream – again the taste of the cigar was overall pleasant, but milder than I’d have liked or expected. Also worth noting, the CAO America produced a beautiful firm salt and pepper ash that got to nearly 2 inches before it broke off.

I enjoyed the CAO America Landmark right down to the nub.

Overall I’d rate this cigar about a 7 out of 10 – definitely pleasant, very mild – perhaps too mild – and definitely worth smoking again. The gorgeous red white and blue labeling and pin-striping would make this a fine choice for a Fourth of July cookout.

I had a great visit to the Fine Cigar and Tobacco shop in Glastonbury today where I enjoyed my CAO America Landmark in their lounge watching the first Spring Training game (Mets beat the Braves, 4-3 – yay!) with two locals, Art and Rick. Not a bad way to spend a Saturday afternoon.

©2019 JMSurprenant

My Funny Valentine

I have always been a big fan of the homemade Valentine – nothing says tradition to me than a handcrafted paper heart, embellished with lace, foil and/or glitter. I’ve made plenty of these paper hearts for my Valentine over the years, but for 2019 I wanted to take my game to the next level. In my experience, most anything can be improved by adding electronics – so why not the humble Valentine?

I started by building the Velleman MK101 Flashing LED Sweetheart Mini-Kit, a simple and fun build that took less an hour with only 9 resistors, 2 NPN transistors, 2 electrolytic capacitors and 28 red LEDs.

The trickiest part of the build was making sure that the polarity for each of the LEDs was correct. This wasn’t difficult as the cathode for all of the LEDs were oriented to the left side of the PCB, so it was just a matter of taking an extra moment for each LED to make a mindful check that the shorter lead was inserted on the left side of the board.

I attached the LEDs in four groups of seven each, again working slowly and double-checking each to make sure polarity was correct before applying solder.

When the moment of truth came to test the circuit, I was relieved that it worked. Despite working meticulously to install the LEDs with the correct polarity, it would be a real chore to identify any that were installed incorrectly after the excess leads were nipped off.

The “heart” of my valentine project!
Schematic diagram for flashing heart
© Vellemen, Inc.

Now that the flashing heart was done, the next question was, “How do I present it to my beloved?” The circuit board doesn’t fit well in a paper envelope so I’d need something three dimensional. Cigars to the rescue!

One of the many nice things about being a cigar smoker is that if you’re any good at it, you will eventually collect a surplus of nice wooden boxes which make for great project cases. I had just the thing in my collection – a small nearly square wooden box that originally contained Erin Go Bragh Irish Creme Cigarillos (a delicious quick smoke, btw).

The Velleman heart was a perfect fit – I could easily mount it inside the box and use a NC push button switch to power the circuit when the box was opened. This would be a snap and yet there was plenty of room left over. Maybe too much room? So I started wondering – how I might use the free space to make this project even better?

After more reflection and more research online, I came up with the idea of turning this valentine project into a music box that would play “our song” [Moon River, by Andy Williams] when the box was opened.

SparkFun had what appeared to have just the thing I needed – an all-in-one Arduino based MP3 trigger kit – the Qwiic MP3 trigger. The board comes complete with an on board 1.4W Class-D mono amplifier, and it can read from a micro SD card, and be triggered to play with a single switch closure. The price was right too – just $19.95 as of this writing – so I placed my order.

The SparkFUn Qwiic MP3 trigger microcontroller board.

The only problem I saw was the admonishment on the SparkFun website that the MP3 trigger board must NOT be powered by anything greater than 3.3 VDC. Yikes – the plot thickens!

There were two options for making the 3.3 volts for the MP3 board from the existing 9 volt battery. I could either use a linear regulator or a buck converter.

A buck converter is a little more sophisticated in design and it steps up current as it steps down voltage. A linear regulator is a simpler design and doesn’t reduce current but instead it dissipates as heat the voltage times the current drop.

Given my space constraints in the tiny cigar box and the overall simplicity of my project, I decided to use a linear regulator but first I needed to ‘do the math.’

The published documentation for the MP3 trigger states that the board has a current consumption of 40mA at standby and 150-300mA driving an 8 ohm speaker at full volume. The Velleman flashing heart kit documentation states it consumes 8mA and a Duracell 9 volt alkaline battery is rated for 500 mAH.

So, conservatively assuming the max current consumption of between 158 and 308 mA during full volume playback, the battery should last 1.62 – 3.16 hours. Since the Moon River MP3 is 2:44 long, I could expect at least 35 to 69 plays before the battery died. Ultimately as I did not change the stock volume setting of 10 (out of 32), the actual battery life should be much better than my conservative calculations.

Building the voltage regulator was a snap. The simple circuit calls for nothing more than adding a pair of capacitors to a TI 3.3V LM1117 voltage regulator chip.

Schematic of the simple voltage drop circuit using the TI LM1117. Output is 3.3V and 800 mA.

After I built and tested the voltage regulator circuit, I did not have to wait long for the Qwiic MP3 Trigger to arrive from SparkFun. It showed up just a couple of days later. along with the fresh microSD card and a USB C cable I also ordered.

According to the online documentation, when the No.1 pad on the board is shorted to ground, the Trigger will play the MP3 file saved to the SD card named T01.mp3. 

I inserted the new SD card into the board and plugged it into my PC via the USB-C cable and Windows 10 immediately recognized the device as external device “E:”  I was able to simply drag and drop a properly renamed copy of my Moon River MP3 from Google Music.  So far, so good.

But, when I first tried to test play the MP3, there was no joy.  The SparkFun website shows the device playing the T01.mp3 by shorting the proper contacts with a pair of tweezers, but this wasn’t working for me.

I studied the photo on the SparkFun website closely and then I realized my error.  The board needs to be powered but disconnected from the PC.  When I unplugged the board from the computer USB port and hooked it up to my voltage regulator circuit and shorted the number 1 contact to ground it worked perfectly!

Wiring up the voltage regulator to the MP3 Trigger for a test play – it worked!

My final concern was whether I would need to incorporate a second NC push button switch to trigger the MP3 after the board is powered up.  The online documentation stated that the board may take up to 1500 ms to power up.  I had hoped if I needed a second push button, I could place the first one closer to the front of the cigar box and the second closer to the hinge for adequate timing.

I wanted to see what happened if I applied power to the board with the No. 1. contact already shorted.   Would the MP3 begin playing when power was applied?

YES Indeed! The MP3 automatically started playing in this configuration just as I had hoped. The music also stopped when power was disconnected, and would immediately start again from the beginning when power was reapplied.  This would be absolutely perfect for my music box application as I could employ one NC push-button switch to provide power to both the heart circuit and the MP3 circuit causing the LEDs to flash and the music to play when the box was opened and stop whenever it was closed.

All that remained was mounting all into the cigar box. In determining the layout, I realized the biggest constraint was that changing the battery would be impossible if I used the built in battery clip on the back of the Velleman heart..

Laying out the music box parts – I moved the 9V battery away
from the flashing heart board to facilitate battery changes.

I thus opted for moving the battery to an easily accessible spot on the left side of the box, making a simple battery holder by gluing a dowel snugly up against the battery. I attached a second 9V battery clip with the polarity leads reversed (red to black and black to red) to supply power the heart.

Everything else was mounted inside the cigar box using hot glue – not elegant but very practical. The power on push button was placed in the top left corner on the hinged side of the lid, the voltage regulator is on the bottom of the box near the back on the right side, and the MP3 trigger is cemented to the front right side. The MP3 board has a 3.5mm stereo jack which remains accessible if anyone wanted to plug in a pair of earbuds to hear the music in glorious stereo.

The mini 8 ohm speaker was attached to the front of the box using the 2 sided adhesive provided with the speaker.

I decided I did not want to refinish the little cigar box to make it look like anything other than what it is – an electronic valentine made on my workbench – this thing screams “James.” For an added touch of workbench authenticity, I made a valentine greeting for the lid with my Dyno label maker…using red tape, of course!

THE FINISHED MUSIC BOX – ready for my sweetheart!

This was a great project and along the way I learned about voltage drop regulators. Working with the SparkFun micro controller board was fun easy and educational. I am aware that the board has many more features that I did not need for this project and that performance can be tweaked by editing the sketch in the Arduino IDE – something to consider for next time.

HAPPY VALENTINE’S DAY!

©2019 JMSurprenant

7-20-4 Cigar Reviews

The 7-20-4 cigar brand goes all the way back to 1874 when Roger G. (RG) Sullivan started his cigar company in New Hampshire. The distinctive numerical name came from the address of his factory at 724 Elm Street in Manchester, NH.

The popular 10 cent RG Sullivan 7-20-4 cigars were handmade with a Havana filler wrapped in a Sumatra wrapper and remained popular until Cuban Embargo forced the company to close in 1963.

In 2006, New Hampshire based cigar retailer, Kurt Kendall, decided to revive the brand name as an homage to the past. Importing tobacco from five countries, KA Kendall’s 7-20-4 boutique blend has been winning critical praise since its launch and Kurt continues to launch new varieties under the 7-20-4 brand.

My personal interest in the RG Sullivan brand comes from the fact that my maternal grandfather, Matthew Dziadosz, was a cigar smoker and he was brand loyal to RG Sullivan, smoking both the 7-20-4 and Dexter cigars produced in Manchester, NH.

Knowing the brand was defunct, spotting the distinctive 7-20-4 label on a box in a local cigar shop a few years back gave me pause. I purchased several 7-20-4 sticks that day, which I enjoyed while learning the history of the brand’s recent rebirth.

I have enjoyed several of the KA Kendall 7-20-4 cigars in recent years, including the Factory 57 and barber pole wrapped Hustler series. This past weekend, whilst up in New Hampshire to watch the Super Bowl with dear old dad, I spotted 7-20-4 cigars at the Two Guys Cigar shop in Seabrook and am reviewing here the standard 7-20-4 Toro and the newer 7-20-4 WK Series Robusto.

7-20-4 WK SERIES ROBUSTO

This recent offering from Kurt Kendall is a tribute to his son, William who passed away in 2011.

The wrapper is a nice mild Ecuador CT leaf. The filler is Nicaraguan and Honduran, bound with a Honduran binder.

The cigar has light to medium tan appearance, with smooth seams and several small veins. The stick was very firm, towards the stiff side and felt a bit dry. I was saddened to see the nice triple cap cracked when punched. Perhaps this particular cigar had been stored improperly or exposed to the cold? It was my first and only WK Series to date, so I will reserve judgement here.

The cold draw was flavorful – the predominant flavor I picked up on was cedar and a nice sweetness, like bakery. I read another review online that described hints of butter cookie and I definitely got that.

The first third had a good but slightly loose draw and a perfect burn. The flavor profile was predominantly cedar with some initial sweetness, some cream and nuttiness were also noticed.

By the second third the flavor opened up a bit, the cigar became very creamy with predominant cedar and some spice. I noted a definite butter cookie flavor happening here.

This continued into the final third, a similar flavor profile of cedar, cream and butter cookie. All throughout the last two thirds the draw continued to be a bit loose, but good and the burn was absolutely perfect.

The 7-20-4 WK Series Robusto – a mild flavorful smoke.

I would rate the WK Robusto from KA Kendall’s 7-20-4 line a solid 8 out of 10 and a cigar I would definitely look for again.

7-20-4 GRAN TORO

The 7-20-4 Gran Toro is a beautiful classic looking cigar with its 56 ring gauge and 6.5″ length. The outer leaf is a dark chocolaty brown showing few veins, smooth seams, a single cap and a pigtail. The cigar was well packed, firm to the touch and just slightly toothy.

The filler is a blend of Nicaraguan, Honduran, and Mexican leaf tobacco, held together with a Colombian binder all inside a Brazilian wrapper. A puro, this stick is definitely not!

I really loved the cold draw of this cigar – earthy, dried fruit, some spice and a hint of molasses were all noted. I took my time and enjoyed drawing on the unlit cigar for a while before starting it with my torch.

Upon lighting the cigar, the first flavor that hit my tongue was red pepper, but not strong pepper – more like a sweet red pepper flavor. There was also a nice flavor of wood, more oak than cedar. A very pleasing flavor combination off the hop.

The flavor profile continued well into the second third as well – nice red pepper, oaky wood and along the way some floral notes were introduced.

This flavor profile continued into the final third and right down to the end – sweet red pepper, wood and earthy floral notes – this was a very tasty cigar, but surprisingly a bit milder than I would have anticipated.

Throughout the cigar, the burn was razor sharp and the draw was very good. The 7-20-4 Gran Toro produced good smoke and a sturdy white ash.

As I mentioned I am brand loyal to Ken Kendall’s resurrection of the 7-20-4 label and I feel a connection to my late grandfather whenever I light up one of these great cigars.

Learn more about 7-20-4 here: https://www.7-20-4.com/

©2019 JMSurprenant

Admiral 7CS5W radio/phono (teaching a man to fish)

Today I traveled back to the Merrimack Valley to visit a high school buddy, Larry, who like me, has caught the vintage electronics bug.

An increasing number of vintage radios, phonographs and – gasp – 8-track players – have been finding their way to Larry’s home, and as you might expect, most need a little TLC to return them to fully functional status.

I have helped Larry in the past, having recapped his 1937 Philco console AM radio and having done a full restoration of his Westinghouse “Little Jewel” H126 ‘refrigerator’ radio.

Larry was under the mis-perception that I am some sort of electronics genius because I was able to resuscitate those dead radios back to life. Ha! So when he recently called me asking for help with his 1940s era Admiral console radio and phonograph that had a low volume problem, I thought it was a good time to stop giving Larry fishes and give him a fishing lesson.

The Admiral 7CS5W is a 1948 6 tube superheterodyne AM band only radio receiver with a 78 RPM record changer in a side-by-each console arrangement. Larry’s complaint was that whether the radio or the phonograph was playing, the volume was too low.

We downloaded the set schematics from the www.radiomuseum.org website and I showed Larry how to read the schematic, working from left to right, identifying the different stages of the radio circuit. We focused on the final audio stage which included a 6SQ7 phase inverter and a pair of 6K6 power output tubes.

Admrial 7CS5W Schematic courtesy of the RadioMuseum.org

We started our work by testing all of the tubes, starting with the above named audio stage tubes, using my grandfather’s EMC 205 tube tester. We tested all tubes for shorts and quality and all passed.

It was time to pull the chassis and see what was going on underneath. Looking at the chassis, I immediately noticed a hole where the original canned filter caps would have been – clearly someone had already serviced the radio and had replaced the electrolytic capacitors.

The hole in the chassis suggested that someone had previously
serviced this radio and replaced at least the filter caps.

I was mildly concerned that because the tubes tested good, as they did, and someone had recently recapped the radio, the low audio problem was going to be more complex to solve.

We discovered that while someone indeed had previously serviced the radio, and had replaced the two electrolytic capacitors, he only replaced about half of the wax caps. Also more interestingly, those replacement caps did not look that new. The electrolytic capacitors were a pair of large General Electric cap that I’ve never seen before. The other replacement caps were a variety of blue-green paper caps that I was also unfamiliar with. I would have to guess that this radio was last serviced in the 1970s or early 1980s.

BEFORE: Notice the big copper cylinder GE electrolytic caps an the blue paper caps on the right side of the chassis – the previous recap job was incomplete and apparently done some decades ago. It was time for this radio’s 30 year tune up.

So, starting with the filters, we recapped the entire set. Larry was a quick student, absorbing what I taught him about how capacitors function and why they need to be replaced – see my previous blog post about recapping The Glendon RCA receiver.

We needed to manufacture a pair of 30 MFD electrolytic caps as the stock I brought did not have that value. For each we wired a 10 MFD and a 22 MFD in parallel to produce a pair of 32 MFD capacitors. When working with old radio circuits, capacitor values aren’t critical. As long as the replacement caps has the correct voltage rating or higher, it’s generally o.k. to replace the original with a higher value. For the .002 MFD caps in the Admiral, we used .005 MFD replacements.

After about 2 hours work and a lot of good conversation, we had the two electrolytic caps and ten of the wax and paper caps replaced.

AFTER: Notice the ‘built up’ black electrolytic caps at the bottom of the chassis. We wired a pair of 10 MFD and 22 MFD capacitors together to make a pair of 32 MFD filter caps. Notice too how much less space the new yellow caps take up under the chassis.

Now was the moment of truth – would the recapping improve the low audio? Only one way to find out. We put the tubes back in, reinstalled the chassis in the cabinet and reconnected the speaker, antenna, and phono connectors and braced ourselves for the ‘smoke test.’ How did we do?

SUCCESS!

Replacing the capacitors completely resolved the low volume problem. The radio and phonograph ought to be good for the next 30 years.

In the end we saved another beautiful old radio , we launched Larry on the road of vintage electronics repair while catching up and I also disavowed him of his mis-perception that I’m some sort of a genius – not a bad Saturday at all.

©2019 JMSurprenant

Alec Bradley Nica-Puro Rosado Gordo

I stopped by the Owl Shop after work today, a chilly late January Monday, with the Alec Bradley Nica-Puro Rosado Gordo in shirt pocket.  The cigar was a gift from my brother in law, Liam, who shares my love of cigars.  Liam and I have enjoyed several sticks together after family gatherings and the conversations have always been as good as the smokes.  Liam and I are both fans of the Alec Bradley line; I have never smoked the Nica-Puro before.

The Gordo is a hefty 6.2” 60 ring gauge cigar.  As the name suggests, this is a Nicaraguan puro – a Nicaraguan double binder and core of long-fillers from Nicaragua’s 3 main growing regions — Jalapa, Condega, and Esteli — are wrapped in a handsome Nicaraguan Rosado leaf.

Appearance is a nice oily chocolate brown, the Rosado wrapper is smooth with a couple of small veins and no seams.  Construction was very firm, with some softness noticeable just beneath the beautiful double-band.  The triple cap was impressive.

The cold draw was very flavorful.  Delicious notes of dried fruit, spiciness and some cedar.

The first third started off with strong notes of cedar, pepper, earthiness and some cocoa and nuttiness.  The burn was excellent, and a perfect draw.   The ash was salt and pepper and firm – and didn’t break off until about the inch and a half mark.

By the start of the second third, the flavor became creamier with continued strong notes of cedar, nuttiness and pepper.  There was a hint of leather and some cocoa.  The burn continued to be perfect throughout the second third.

Final third became creamier and the cedar and pepper notes continued right to the end and the burn remained perfect.  The cigar needed no touching up and never became bitter or stale tasting.  The smoking time was an hour and forty minutes.

The AB Nica-Puro was about as good as a cigar can be.  I would score it a 10 out of 10, a rating I don’t give often – but this is a true classic.

Recapping “The Glendon” RCA Victor Model 6-XD

At the 2018 New England Antique Radio Club Radio and Vintage Electronics Show, I had the good fortune of winning not one, but two door prizes!

The first was a circa 1955 RCA Model 6-XD-5A “The Glendon” AM broadcast receiver.  The radio was promised to be ‘operational’ but ‘not restored.’  The second prize was a coupon to WJOE Radio, a favorite local vendor for radio restoration parts who also attends the NEARC Show each winter. I used the coupon to stock up on a couple of capacitor assortment boxes realizing I could use the capacitors to recap the Glendon at some point.

That “some point” came just two months later in April when after listening to the radio for just about an hour and a half I heard a loud sizzling sound, followed by a loud “pop!” and then loud buzzing from the speakers.

Sure enough, upon opening the set up I discovered that one of the wax capacitors, No. C11, on the power line had exploded.

The failed C-11 capacitor.

A lot of folks are under the misimpression that when restoring old radios, the number one problem is that the old tubes have gone bad and that finding replacements is hard and expensive.  The truth of the matter is the absolute number one affliction that antique radios suffer is failing capacitors.  Replacement caps are plentiful, and inexpensive and many radios can be brought back to useable life by just recapping the set.

Over time wax and paper capacitors fail and the dielectric in large filter caps either dries up has leaked out.  A capacitor that fails appears in circuit as a resistor and will not block DC while allowing AC signals to pass as they should.  A sure sign that caps have failed in vintage radios is the presence of a predominant loud hum on the audio output.

Replacing capacitors is generally straight forward and easy.  It’s simply a matter of removing the old capacitors and replacing them with modern day equivalents.  Many times, you can easily read the values off the old capacitor once it is removed, but it’s also always a good idea to download a copy of the schematic and work from that.

BEFORE
AFTER

There are two values you need to be concerned with when replacing capacitors – the capacitance value and the voltage rating.

Capacitance is measured in farads – typically microfarads (MFD) or in picofarads (pF).  1 farad is equal to 1,000,000 microfarad, or 1,000,000,000,000 picofarad.

It’s always good to work from a schematic diagram – I found the schematic for this radio on the Radiomuseum.org website – the troublesome C11 is highlighted above.

When replacing capacitors, an exact match for the capacitance value is seldom critical, especially when working with consumer grade AM radio circuits.  If you are unable to find a replacement cap with the same value, it is generally o.k. to use a close or higher value capacitor in the circuit.

You can also combine capacitors together to create a capacitor with the proper value.  The math is simple – if you connect capacitors in parallel, their value equals the sum of the individual capacitors.

C1 + C2 + Cn in parallel = Ctotal

The second value you need to be concerned with when replacing capacitors is the voltage rating which is often abbreviated WVDC (working voltage, direct current) on the capacitor and on the schematic. Always be sure to replace capacitors with new units that are rated at the same working voltage or higher.

So, returning to The Glendon, I replaced C11 and all the other wax capacitors.  I noticed that the previous owner had replaced the electrolytic filter caps already.  The schematic called for a 30 MFD and a 50 MFD filter cap.  The previous owner installed a pair of 450 volt 47 MFD caps so I left well enough alone.

The “Dead Soldiers” removed from the set.

Sure enough, my recap job brought this fine old radio back to life and it spent last summer as my chair-side radio on the front porch for Red Sox games.  And what a year it was for listening to Boston baseball on the radio!

RCA VICTOR CO., INC. MODELN 6-XD-5C “THE GLENDON” SPECS:

Year: 1954/1955 
Tubes: 12BE6 12BA6 12AV6 50C5 35W4
Circuit type: Super-Heterodyne IF 455 kHz; 2 AF stage(s)
Tuned circuits:6 AM circuit(s)
Bands:  AM BCB only, 540 – 1600 kHz
Loudspeaker:  2 Loudspeakers / Ø 4 inch = 10.2 cm (not stereo)
Power out:1 W (1.5 W max.)
Material: Plastic
Dimensions (WHD): 12.5 x 7.5 x 6.375 inch
Antenna: Build in loop antenna
Power consumption: 35 watts.
Other: has audio input jack to connect Victrola record player.

©2019 JMSurprenant

SSTRAN AMT3000 AM Transmitter

The SSTRAN AMT3000 transmitter.

One of the saddest things about my hobby of restoring vintage radios is the absolute lack of quality programming on the broadcast bands today. 

Not only is the golden age of radio long gone, today’s AM airwaves are chockful of hate filled right wing talk and syndicated FM commercial radio is mostly insipid crap music. A couple of summers ago, I built a 2 tube regen radio receiver kit with my 10-year-old niece, and while the build was quality time spent together, in the end she was left with a radio that is of no use to her.

But, while there may be very little worth listening to on the broadcast bands today, there is no shortage of excellent programming available as podcasts – good music, true crime, documentaries, comedy and even drama – free for the taking for enjoyment on your smart phone or other device.  This cornucopia of content can make ‘watching the radio’ wonderful again.

There are three easy ways to play modern podcasts and other recorded programs on a vintage radio. 

The first is to add an “AUX IN” to a vintage radio, like many new radios have.  The circuitry is simple and with a handful of parts, including a 1/8 stereo jack, you can easily play the output from your iPod, smart phone or CD player through the radio’s AF stage.

This “AUX IN” mod is popular with radio repair folk who restore vintage radios for resale.  Look at what is available for sale on http://www.radioattic.com and you’ll find many radios for sale with the mod.  If this interests you, check out the YouTubevideo by D-Lab Electronics here.

The second method is to add a Bluetooth receiver wired into the radio’s AF stage like the “AUX IN” jack mod above.  This mod is attractive as the listener can easily transmit podcasts and music from their smart phone to the vintage radio.

For me, the third method that I am profiling here, using a low power transmitter to ‘broadcast’ programs to my vintage radios is a bit more authentic as ‘real radio’ transmitting a modulated RF signal to the receiver where the ‘whole radio’ is being used from the RF to the IF to the AF.

So, a few years ago I decided to build the SSTRAN AMT3000 transmitter kit.  It is a popular solid state transmitter that costs about $100. As of this writing, it is not clear to me whether the kit is still available or not as the www.sstran.com website still has an announcement on the home page stating that as of November 12, 2017 they are not accepting any new orders. However the catalog page and shopping cart still appear functional. 

I had considered other options including a scratch build or this $40 tube based AM transmitter kit. The tube option had two solid arguments going for it – it was definitely cheaper and using a tube-based transmitter seemed a better match stylistically for most of my antique radios as they are tube based.

However, the AMT3000 won out as it had a few qualities that the tube kit did not offer.  These included separate up-front controls for gain, modulation and signal compression.  The AMT3000 is also easily tuned to different frequencies on the AM broadcast band by setting DIP switches. 

I had also read several online reviews and discovered that the kit had a very good reputation. The fit and finish were attractive too so the SSTRAN kit won out in the end.

I recall it took me two, maybe three evenings to construct the kit. The build was easy thanks to excellent documentation, good PCB layout and no toroids or coils to wind. There was a single surface mount IC, however, but it only has 14 leads and spacing was wide enough that I had no difficulty with my middle aged failing eyesight and shakier dexterity.

The completed circuit board.

In the top left view above you see there are two audio in jacks.  This is a mono transmitter, but you can feed a stereo signal through the two jacks which are combined to mono.  I use a stereo to RCA jack patch cable to connect the transmitter to my PC or CD player.

The transmitter comes with a wall wart step down transformer that puts out 11 VAC; the voltage regulator can be seen with the heatsink above. 

A PLL synthesizer references the 4 MHz crystal to precisely set the transmit frequency.  The DIP switches mentioned above to tune the transmitter is seen just below the heat sink on the voltage regulator. The manual includes a table showing the settings to tune across the AM broadcast band.

Notice the three RF chokes, which can be switched in or out of the circuit with jumpers to reduce hum caused by stray RF. Two chokes isolate the power input and the third isolates the audio input ground from the PCB ground. 

On the right side of the board you will see a four position DIP switch used to switch several inductors in and out of circuit to assist tuning the indoor long wire antenna supplied with the kit.  The instructions describe the construction of a base loaded vertical outdoor antenna that can be used to transmit up to a 2-mile radius which I have not built. When using the external antenna, these inductors are switched out.   

For my purposes, I have setup my home AM broadcast station on the operating desk of my ham radio stationon the second floor of my house.  As I amonly interested in transmitting a signal to radios within my house, I am usingthe provided long wire antenna which I have hanging out a second storywindow. 

My transmitter is tuned to 1,000 kHz which is a relatively dead spot on the AM dial in New Haven County, despite the number of signals coming from NYC to the southwest and Boston to the Northeast.  I get little interference day or night.

My transmitter is connected to a beater Dell laptop I bought refurbed from Walmart.com for a song.  I installed Ubuntu and use the Beatbox app to manage the queue of podcasts and MP3s.  I leave the station on 24/7 so now there is always something worth listening to on the radio.

I mentioned above that the AMT3000 has a compression control, which is a real nice touch.  Turning down the compression increases the hi fidelity of the signal, music actually sounds better to my ears than what is typically heard from commercial AM stations.

My home AM radio station – the SSTRAN AMT3000 transmitter sits atop my EICO 723 Novice transmitter on the AB1DQ operating bench. Programming is queued via the Beatbox app on my Ubuntu Dell laptop.

If you are looking for an AM transmitter to bring life back to your vintage radios, you won’t do any better than the SSTRAN AMT3000.  It is a real solid performer and simple enough build for anyone with moderate soldering skills.  I have gotten many years of satisfaction from mine.  Every December I use it to transmit holiday music to vintage radios placed throughout our house during our annual Christmas party – it’s a fine way to showcase the radios I have lovingly restored.

SSTRAN AMT3000 SPECS:

  • FCC Part 15 Compliant
  • Emission type: A3 Amplitude Modulation.
  • Modulation Type: Series Modulation.
  • Modulation Capability: 100%
  • Carrier Shift: less than 0.5%
  • Broadcast Frequency Range: 530 kHz to 1705 kHzin 10 kHz increments
    (a 9kHz increment version is also available for non-US radios)
  • Frequency Response: 10Hz to 20kHz
  • Audio Input Level: 200mV for 100% modulation
  • Audio Input Impedance: 4 ohms to 50K ohms
  • Distortion: 0.5%
  • Final DC Input Power: 100 milliwatts (full legallimit per FCC Part 15)
  • Duty Cycle: 100%
  • AC Ripple (Hum): Less than 0.3%.
  • Frequency Stability: 0.003%
  • Antenna Matching System: Pi-Network