

“Thinking INSIDE the Box”
This presentation was first given at the ARRL Northeast HamXposition in Marlboro, Massachusetts on Saturday, August 27, 2022.
All original work © 2022 JMSurprenant, and other original creators as cited.
Please contact me at james@ab1dq.com if you wish to have a copy of the full slide deck or to inquire about my availability to present this material at your local ham radio event.
“Creativity is inventing, experimenting, growing, taking risks, breaking rules, making mistakes and having fun.”
~Mary Lou Clark
Ham radio is unlike and superior to all other hobby radio services as it not only allows licensed operators to build, test and experiment with our radios and other equipment, we are encouraged to do so.
Long before I earned my ham radio license, I’d spend hours on end as a child creating various projects fueled by my imagination, using the never ending supply of empty cardboard Dexter cigar boxes my grandfather had stashed in our basement.
Several of my creations in my early adolescence involved radio & electronics projects. Besides providing me with a stash of cigar boxes to play with, my grandfather also had a fairly complete electronics workbench in our basement, complete with tools, tubes, parts, dozens of radio & TV carcasses in various states of disrepair and a treasure trove of 1960s era magazines including such titles as Pop Electronics. My grandfather had also taken the DeVry Home Radio & Television course before I was born and to my delight, all of his workbooks and home projects were under the workbench.
As a licensed ham radio operator for the last 20 years, one of my favorite aspects of our hobby is kit and scratch building and operating with QRP gear I’ve built myself. Over the years I’ve built projects into aluminum chassis, atop breadboards, in tuna tins and even tiny mint cans. Following in my grandfather’s footsteps in yet another way, I’ve become something of a cigar aficionado in recent years and found myself amassing my own stash of cigar boxes. It wasn’t too long before inspiration struck and I put one and one together.
Why the Cigar Box Chassis?
My cigar box fascination blends two of my leisure loves – radio & cigars. It also gives me the opportunity to challenge my creativity and express myself through unique projects. Building with cigar boxes also connects me to my childhood roots, per above, as well as the very roots of amateur radio, taking me back to the early era of breadboarding. Finally point-to-point construction using terminal strips and increasingly rare leaded components is not only ‘going retro,’ it’s also a lot easier on us older folks. While the parts got smaller, our vision got weaker and our hands a bit shakier!

There are several advantages a cigar box chassis brings to your project, such as:
- adding flair & artistic touch to the project,
- being available in different sizes and shapes,
- being much easier to drill and cut than metal chassis,
- being easily oriented in various ways to accommodate specific project needs.
- having multiple construction planes – the top & bottom of lid, and the bottom of box.
- providing space to store cables, accessories, and documentation inside the box.
Conversely, there are a few disadvantages to be aware of when building a project into a cigar box, such as:
- varying quality of construction,
- cheaper flimsy boxes may be difficult to drill and cut cleanly,
- boxes with thicker lids and sides, make the mounting of some parts difficult,
- lacking the inherent shielding and common ground plane of a metal chassis,
- hinged lids may make for challenging parts placement and wire routing.
“The creative adult is the child who survived.”
~Ursula Le Guin
Inspiration
There are several contemporary kits that I became aware of that helped spark my imagination for my cigar box builds. These included the very fine line of Peebles Originals kits which featured point-to-point construction on a wooden base. I had build a few of the Peebles kits including a one tube regen receiver I built with my 12 year old niece a few years ago.
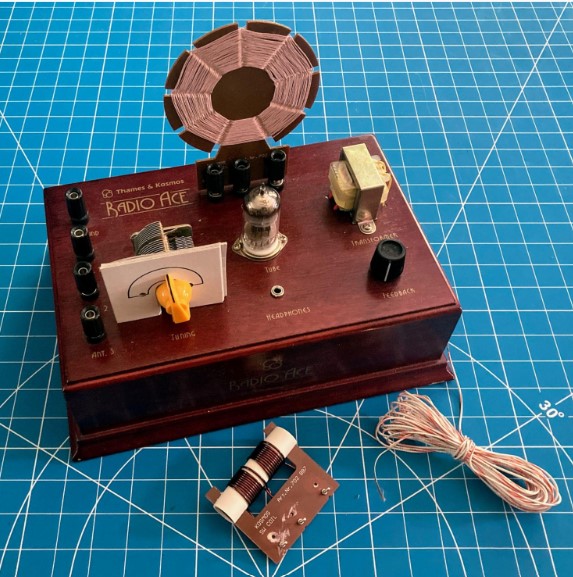
My good friend, and radio cuckoo soulmate, W1YSM, Dr. Ed Snyder, gave me a wonderful gift a few years ago, the Thames & Kosmo Radio Ace, a mid-2000s one tube regen BCB & SW receiver ‘kit’ built into a nicely finished wooden base. This wonderful kit didn’t require assembly but came with a wonderful step-by-step book explaining how radio and this specific circuit works.
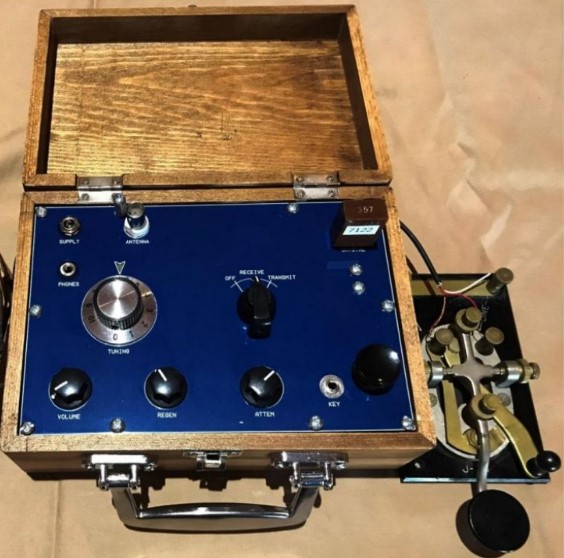
Inspiration also came from the Four State QRP Group’s venerable Bayou Jumper QRP transceiver kit, which is a scaled down solid state replica of a WW2 era ‘paraset‘ rig. The kit is intended to be built into a wooden suitcase box.

Sources of inspiration from L-R: a Peebles Original 1 tube regenerative receiver, the 4SQRP Bayou Jumper transceiver, the Thames & Kosmo Radio Ace.
Where to find cigar boxes
The best place to find cigar boxes is your local cigar shop. Search for them in Google and call around. Better yet, pay your local shop a visit. I have gotten all the boxes I’ve ever needed from the Owl Shop in New Haven (where I’m a regular customer). The Owl Shop puts out dozens of cigar boxes on the curb each week and they are free for the taking. Some shops will charge you for empty boxes and in my experience, you can find great boxes for under $10.


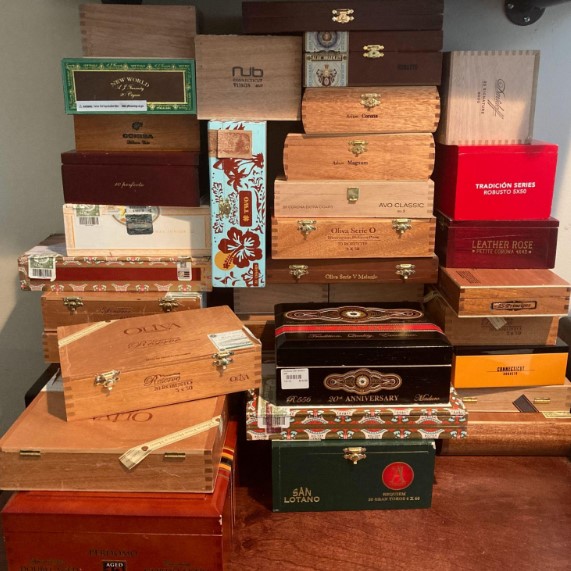
Online sources for cigar boxes include eBay and Etsy as well as craft suppliers such as Michael’s, Hobby Lobby and cigar box guitar kitter CBGitty.
Tools for the job.
In addition to your usual electronic kit tools (solder iron, nippers, pliers, screwdriver) you will need some basic woodworking tools for preparing the cigar box.

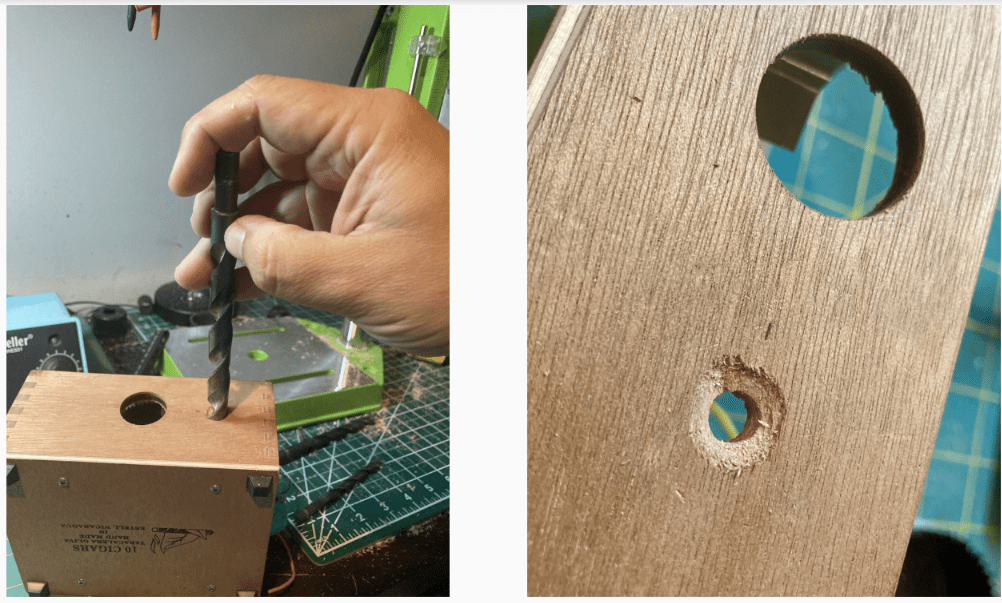
A small drill press with a set of hole saw bits will go a long way in terms of being able to drill neat and precise holes for mounting speakers, meters, tube sockets and holes for switches, potentiometers, varicaps and power, antenna and key sockets.
You will also want to have a small hacksaw and coping saw, files and sandpaper. A square with level is essential for precisely locating the places you want to drill.
I also recommend having a good set of drawing tools that include rulers, compasses and protractors. I am a huge proponent of taking the time to sketch out your box layout and design before drilling any holes. I keep a lab notebook in which I document all of my projects. This is taking the adage, measure twice, cut once to the next level. It’s time well spent and in the end you will have a nice record of your projects, not unlike your logbook of on air contacts.

Keys for success
Proper planning is the biggest key to success, but other keys include:
- Keep & use a workbench notebook. Document all aspects of your project and sketch the circuit, parts and chassis layout. When laying out placement of parts, measure and remeasure. Then measure again.
- Challenge yourself to k three-dimensionally. You have several planes on a cigar box in which to place parts – the top and bottom of the hinged lid, the bottom of the box, and the inside and outsides of the four sides.
- Prototype whenever possible!
- Keep leads short, but allow enough space for troubleshooting and future mods.
- Keep damaged boxes for properly sizing holes for future projects.
Cigar box anatomy and project layout
Start by considering the cigar box from all angles. Turn it over and rotate it and imagine how you want the finished project to look. Consider various placements of parts, controls and circuit boards or terminal strips. Keep the end user in mind and consider ease of use and ergonomics.
You need to pay special attention to the location of the hinge for boxes with hinged lids. The hinged edge is the only place you can route wires from the lid to the bottom or other sides of the box. The back side of the box will logically become the front side of your project where you may want to place switches and controls.

You will also need to be mindful about the depth of parts, measure for adequate room and alignment of all parts when the lid is closed. Consider too that cigar boxes are sometimes made of thin wood and weren’t intended to contain or support heavier components like transformers. Support and balance are both important. You may wish to reinforce the lid or sides by gluing in square dowels. You can also add corner reinforcements found at your local hardware store for additional reinforcement.
Relocating controls off of the PCB
Many modern kits have switches, pots and other controls mounted along the edge of the printed circuit board and are intended to meet the front panel of an enclosure. Sometimes this makes for an easy way to mount a project inside a cigar box. Another option is to move or replace these parts with chassis mounted parts that you can reposition on the front or top of the cigar box. This gives you more flexibility in terms of control placement.
Shielding
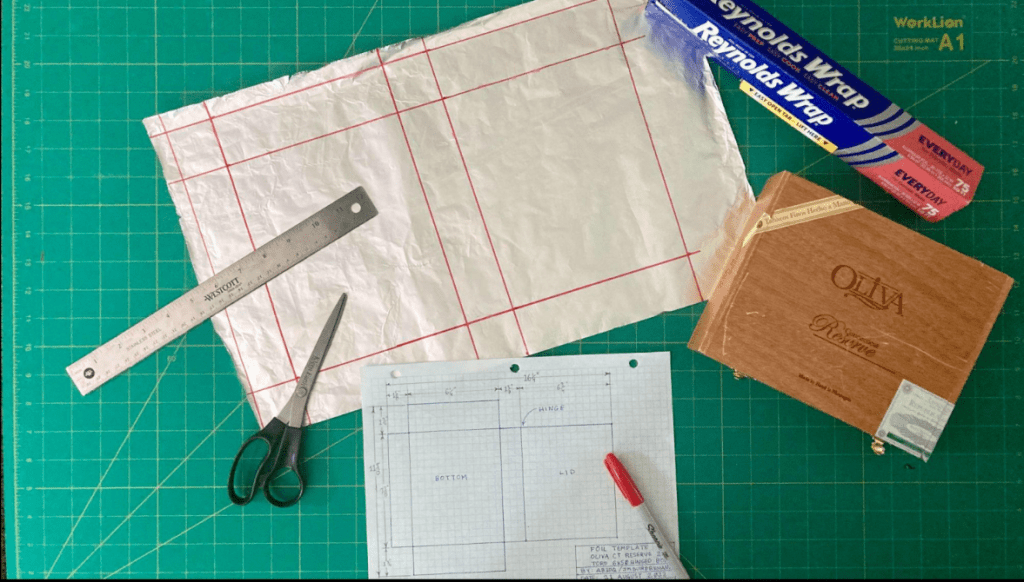
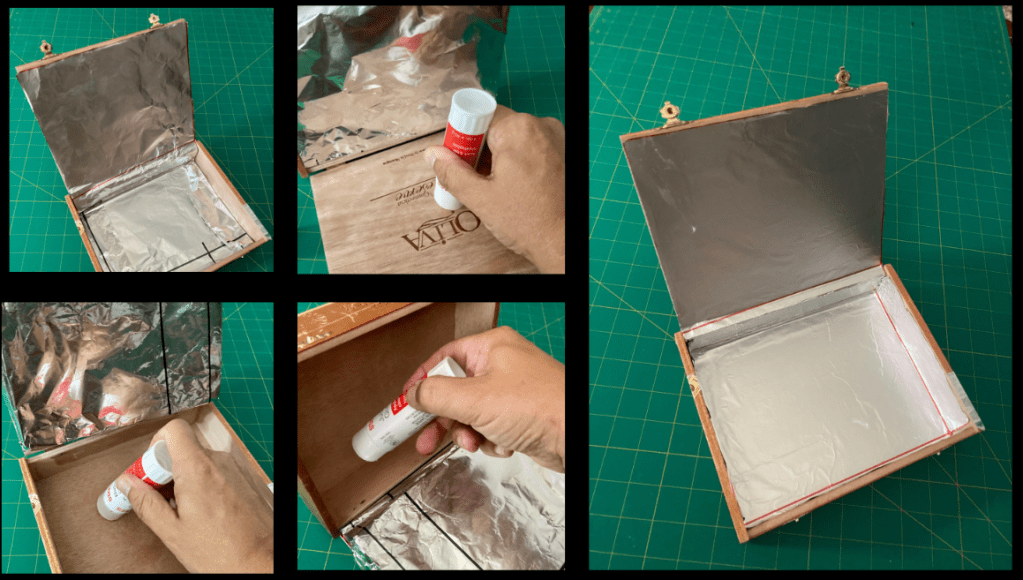
Being non-conductive, your wooden cigar box won’t provide shielding like a metal chassis. This may lead to problems in terms of hand capacitance or interference from other nearby appliances that generate RF. Lining the inside of the cigar box with a layer of heavy duty foil can help. Foil is easily cut & sized and adheres quite well with white glue or a glue stick. Heavy duty aluminum foil is good and cheap, and copper foil is even better but costs more.
I recommend measuring the inside dimensions of your cigar box and then sketching out a pattern on graph paper. Then, using a cutting mat and ruler, transfer the pattern to the foil and carefully cut the foil. Then, starting from the bottom of the box, use glue stick to apply the foil.

Countersinking holes
Potentiometer and varicap shafts, switches, and other chassis mounted connectors may be too short or shallow for thicker cigar box lids or sides. One solution is to countersink a larger diameter hole on the outside of the box to provide space to flush mount a lock washer and nut.
However, many cigar boxes feature soft wood which may easily splinter. When enlarging a drilled hole in soft or thin wood, use a larger drill bit and turn it gently by hand.
“You can’t use up creativity. The more you use, the more you have.”
~Maya Angelou
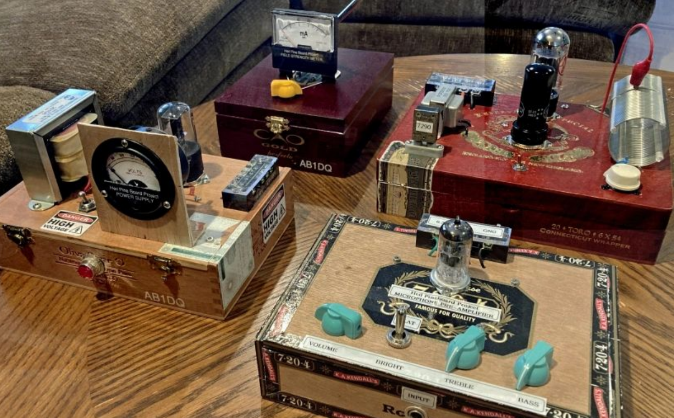
Some selected AB`1DQ creations
To perhaps help spark your imagination and as a means to illustrate some of the construction points I outlined above, the remainder of this article showcases a few of my cigar box projects.
Basic Code Practice Oscillator
I recently built a basic 2 BPT code practice oscillator using the Boy Scout WN0BSA schematic found all over the internet and sketched out my parts layout using Windows Paint.

This project was a bit of pure nostalgia for me as my first childhood cigar box build was a simple transistor CPO similarly mounted in the same fashion with the key attached to the lid in an old Dexter cigar box.
For a simple old school project, I decided to use a pair of terminal strips mounted on the bottom of my cigar box. My CPO layout pushes the abilities of the cigar box a bit further. Choosing a cigar box with a flat lid that folds out flat to the rest of the box when opened and placed upside down, I mounted a J38 key to the lid and pasted a copy of the International Code next to it. With the speaker also mounted to the bottom of the box, the end result is a nifty flip open all in one CPO.

This project was a bit of pure nostalgia for me as my first childhood cigar box build was a simple transistor CPO similarly mounted in the same fashion with the key attached to the lid in an old Dexter cigar box.
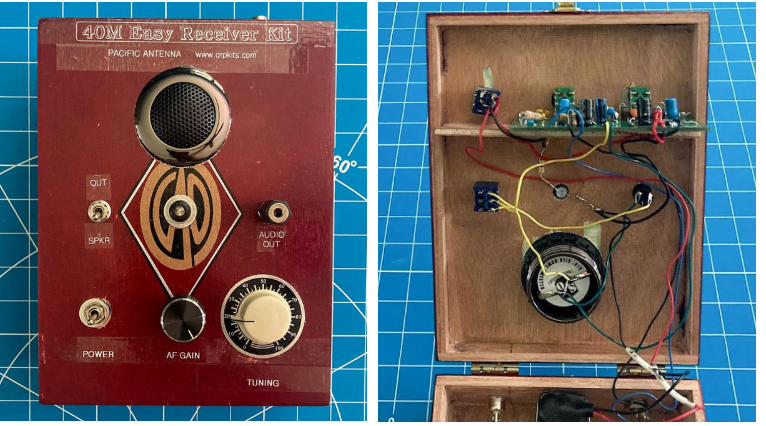
QRP Guys 40 Meter Easy Receiver
I loved the basic kit offerings from the folks at Pacific Antenna. A few years back, along with my fellow advisors to the Amateur Radio Club at Yale, we led a Wednesday Night Workshop at the Yale Center for Engineering Innovation and Design.
The workshop was intended to introduce the uninitiated Yale students, faculty and staff to the basic principles of RF and after a brief presentation, the group paired up and each team built the Easy Receiver Kit. Despite the fact most had never soldered, in the end we had successfully built 10 out of 10 kits. The students in particular were overjoyed when they were able to hear their radios oscillate on an HF rig we brought in.

I decided to give my Easy Receiver the cigar box treatment and mounted it in a small CAO Perfecto cigar box. This is an example of where I measured and drilled out properly spaced holes in the cigar box lid so I could mount the lightweight PCB using just the shafts of the potentiometers.
I added an 8 ohm speaker to the lid, a switchable 3.5mm audio out jack for the use of phones, along with a chassis mounted coaxial barrel power connector, an on-off switch and a power on LED indicator.
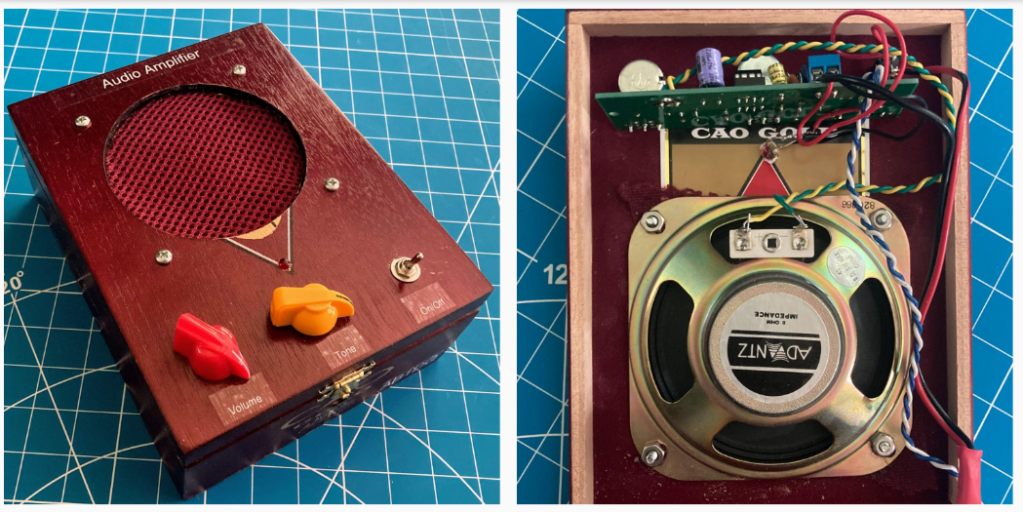
Utilitarian LM386 Audio Amplifier
The LM386 audio amp IC makes it simple to add an audio stage to any receiver project. The chip requires no more than a handful of passive components to build a robust amplifier and the internet is flush with schematics and plans. Here is a schematic for the most basic LM386 audio amplifier, taken from the www.circuitbasics.com website.

If you don’t have the necessary components on hand in your parts bin, there are many kits available online with the PCB and all necessary components, aside from the speaker. Prices range from about $10 from US retailers and can be found literally for pennies offered by Chinese retailers like AliExpress.com

While I have incorporated this amplifier into some of my receiver projects, I have also come to appreciate the value of having a standalone amplifier on the operating bench.
Here’s a cigar box build from a kit that also includes a tone control. Again, I mounted the PCB directly to the lid of the cigar box measuring and drilling holes to accommodate the board mounted potentiometers. The SPST toggle power switch is chassis mounted and placed in line with the volume and tone control.
Transistor Tester
The “transistor tester” kit is fairly ubiquitous online these days and as a frequent kit builder, I have found it to be an indispensable tool when working with small leaded components given their shrinking size and my diminishing vision as I get older. The tester has three terminals to which you can attach resistors, capacitors, inductors, diodes and transistors. The 2 line display returns the type of component and its value and will even indicate the terminals for diodes and transistors.
I built my transistor tester into a cigar box, mounting the display, controls and the terminals to the top of the box. I used three 6-32 screws for the terminals and they are spaced so I can hold most 2 leaded components directly to them for testing. I store three alligator clip jumper cables inside the box when not in use so they are at the ready for short components or when testing three leaded components like BJTs.
I made a couple of mods, replacing the on board trimmer pot that controls display contrast with a same value chassis mounted pot and I moved the power on LED from the PCB to the cigar lid as well.

Ramsey QRP-20 CW Transmitter
Ramsey was a prolific retailer of simple electronic kits and offered a wide variety of ham radio kits as well as other non-radio projects. Their products featured a nifty two piece black plastic project box with pre-drilled end pieces to accommodate the controls for the specific project.
I had built several of their kits over the years, but sadly it’s been a while as the company abandoned the hobby kit business several years ago.
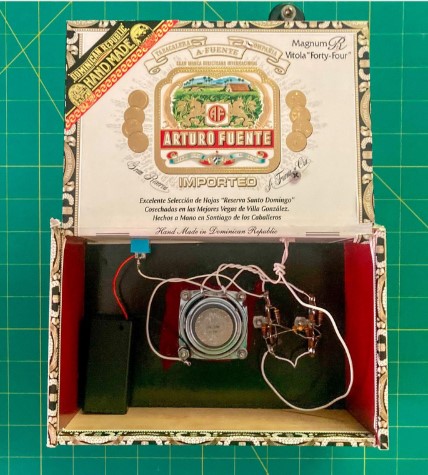
This past winter I spotted an unbuilt Ramsey 20M transmitter kit available online at a not-so-unreasonable price. I purchased it and really enjoyed putting it together. The kit came with the black plastic enclosure, but I realized the dimensions of the PCB were nearly a perfect fit for the inside of the small Oliva Nub cigar box.
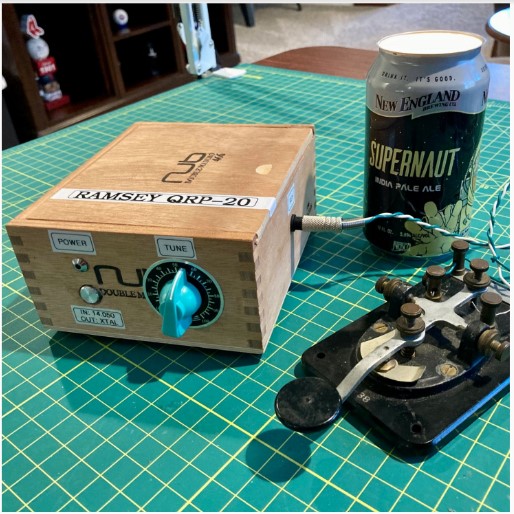
I have already blogged about my build, which you can read in detail here.
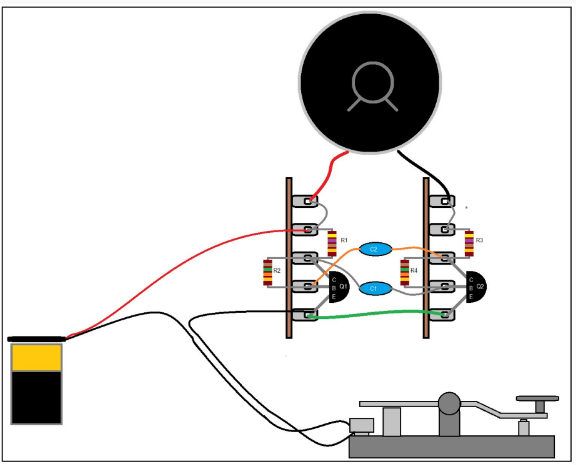
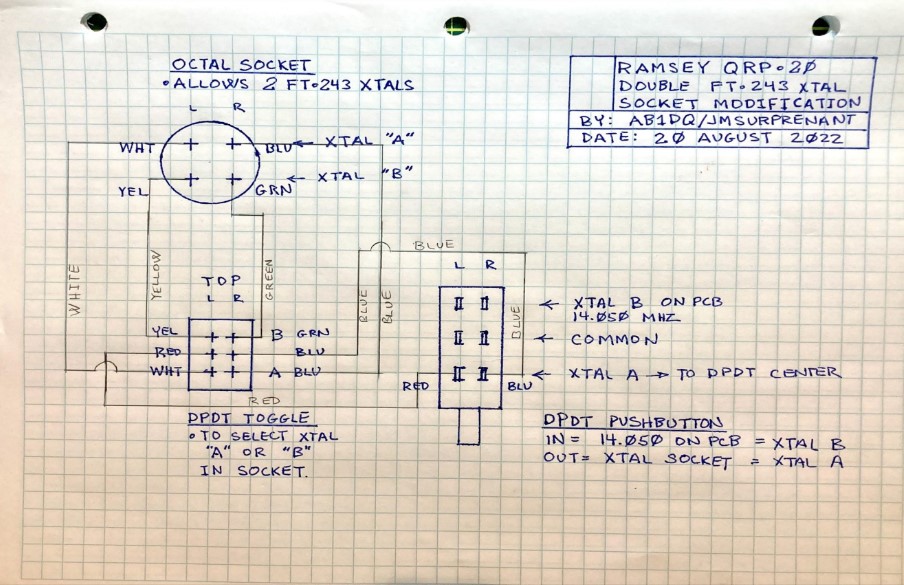
Since my build, I I made a mod in order to give me not two, but three selectable frequencies. I added an octal tube socket to the left side of the cigar box and installed another DPDT toggle switch. The octal socket will accommodate two FT243 crystals so by wiring per my diagram below, I now have a versatile QRP rig.
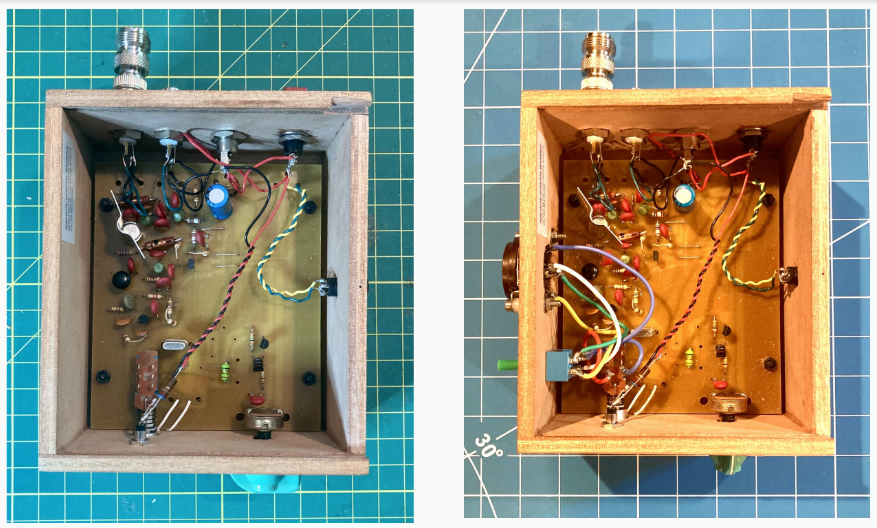
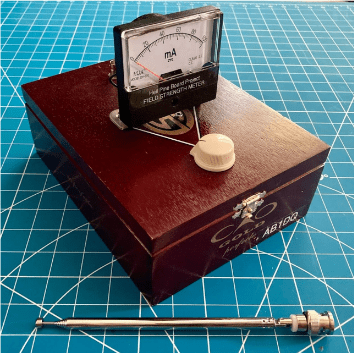
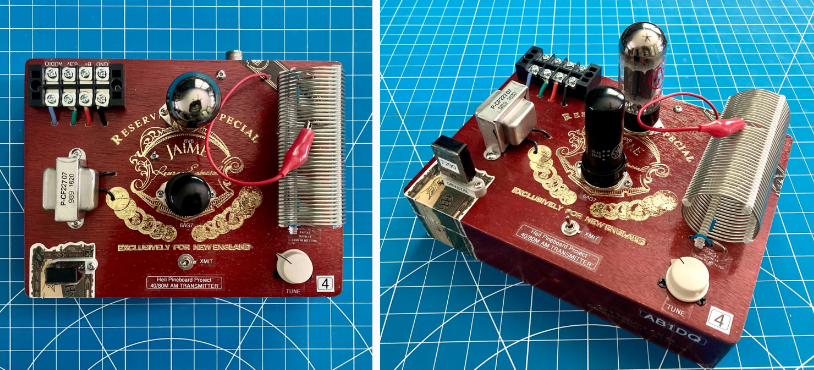
The Heil Pine Board Project Reimagined
Many folks reading this may already be aware of the Pine Board Project, an old school DIY AM transmitter project with four distinct sub-projects – field strength meter, power supply, audio pre-amp w/ equalization and the transmitter itself.
About five years ago (my how time flies!) Bob Heil presented the projects with step by step instructions and updates each week on the HamNation podcast. And the project was also featured in QST, and on Heil Sound website.
I initially built the project as originally presented on slabs of pine wood but then converted my build into cigar boxes. As with the Ramsey QRP-20 above, I have already blogged about my transformation of the power supply here.
I plan to revisit my build and expand my blog post on the rest of the project in the future, but in the meantime, here are some photos of my cigar box mods.

L: The original tube based power supply R: The revised version using a solid state rectifier.

The Takeaway
Ham radio is unique among all radio-service hobbies as we are not just allowed, but encouraged, to build our own gear and to experiment.
Working with cigar boxes scratches my creative itch as I build gear that is uniquely me.
Where will you find your niche? My charge to you: GO MAKE STUFF!

Thanks for taking the time to read my article. If you enjoyed it or have further questions or want to share ideas or want to leave any other feedback, please leave a comment below or feel free to drop me a line at james@ab1dq.com.
I would love to hear what is on your workbench these days!!!

One thought on “Cigar Box Radio”