

As I venture deeper into scratch building I’ve recently become aware of how useful it would be to have an old school dip meter on the workbench to verify the resonance of LC circuits in the receiver circuits I’ve been experimenting with.
In the back of my mind I’ve always been aware of the existence of the dip meter and the tube era term “Grid Dip Meter” seems to have been rooted in my mind going back to childhood. I’m fairly certain the term appeared on amateur licensing exams I’ve sat for, and I know it was ubiquitous in many of the old 60s era Pop Electronics I used to read in my grandfather’s radio shop.
I started a search online to learn more about the history, design, use and availability of dip meters, sometimes called ‘dippers’ today. In the solid state era, field emission transistors (FETs) and sometimes bipolar junction transistors (BJTs) have largely replaced .
FUN FACT: FET based dippers are sometimes called Gate Dip Oscillators while BJT based dippers are sometimes called Emitter Dip Oscillators.
The dip oscillator isn’t a precision instrument by today’s digital standards and several factors could lead to inaccuracies. Despite that, it has numerous practical uses in the amateur radio station. In addition to being used to measure the properties of resonant circuits, filters, and antennas, a grid dip oscillator can also be used as a signal generator, to measure individual component capacitance or inductance and they may also be used for transmission line testing.
I discovered that back in the day, the amateur radio builder had several options to assemble their own GDO from kits. As expected, Heathkit offered several dippers in kit form throughout their history including the Model GD-1 and later, the HD-1250.
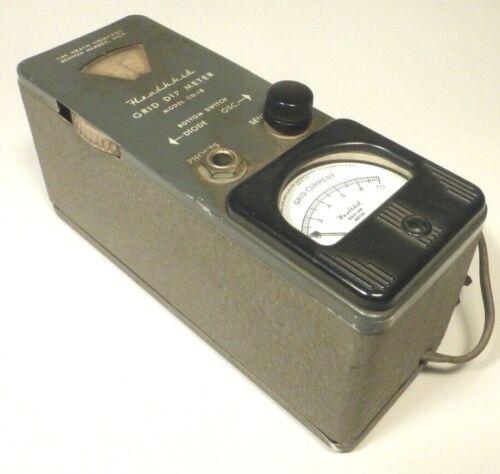
I found several of these old Heathkit GDOs available online and at pretty reasonable asking prices. But as always, when buying used vintage electronic gear, it’s a crap shoot in terms of whether the item bought sight unseen will come complete and be operable. So I decided to explore whether any of the niche kitters offered a modern day equivalent that I could build myself.
This is where I discovered HecKits (www.heckits.com) operated by kit designer and ham radio operator WA7OIB, Darrel Heckendorf. Darrel offers several kits priced under $100 that may be of interest to the QRP builder including an SWR Bridge/Frequency Counter, a Step Attenuator, a CW Keyer, and of interest to me, an FET Dip Meter.
I ordered the FET Dip Meter kit online and quickly received an email from Darrel, thanking me for my purchase, asking me to confirm my shipping address and to inquire whether or not I wanted him to include the optional 6M coil. I had initially missed this email and by the time I replied a day later, I had discovered Darrel had already shipped the kit with the 6M coil at no extra charge and the kit arrived a couple of days later… wow!
I sat down to build the kit this weekend and it was the perfect project for a relaxing Saturday afternoon at the workbench. My initial HecKit experience was everything I look for in kit building.
The kit was well packaged and parts were in clearly labeled zip lock bags. The quality and the fit and finish of the PCB and project case were exceptional. The plastic case fit together precisely and has a nice quality feel about it. The PCB was not thin and flimsy and it featured double sided holes. While it did not have silk screening for parts placement, that was not a problem because the instructions included a large easy to follow diagram of parts placement on the PCB.
Overall, the instructions and documents which Darrel sent by email as a PDF along with my order confirmation was exceptional. Darrel provides a nice introduction to the product and includes several links to learn more about the theory and operation of the dip oscillator and the step by step directions are very easy to follow. Documentation included not only the PCB parts placement diagram, but also full schematics and very clear easy to understand directions for winding the interchangeable coils.
I give Darrel and HecKits high marks for putting together what I would consider a perfect DIY kit. It’s worth mentioning too that the kit came complete with no parts missing.
From start to finish I spent less than 3 hours on the build with the exception of winding the coils, which I still need to do. Generally I don’t mind winding toroids and coils, but the coils for this kit are just a bit small and a tad fiddly for my aging eyes and increasingly shaky hands to easily manipulate, so I thought I’d complete the other coils later on this weekend when I’m feeling fresh. The kit did come with the first coil covering the 1.3 – 2.8 MHz range pre-assembled and it allowed me to verify that my meter worked properly upon completion of the build.

If you’re a QRPer and a builder like me check out Darrel’s offerings at www. heckits.com. As I mentioned, there are several other projects on his site that have caught my eye, particularly the Step Attenuator and the QRP mW meter. I look forward to putting my dipper into use on the workbench as well as my next HecKits build.
Thanks for taking the time to read my blog today. Please leave a comment and let me know if you’ve built this kit or any other of the HecKit lines or share your experience with using a dipper in your station.
