

Introduction
After seeing my OCF Dipole and G5RV wire antennas repeatedly come down over the past 3 years I decided to try something different this fall.
My wire antennas, up around 60′, performed very well, when they stayed up, and I am forever grateful to Bill, W1KKF, who was willing to come out each year with his bow and arrow to shoot the lead lines into my trees.
Knowing that the tops of the trees tended to sway in the wind, I had incorporated strain relief into my subsequent installations by attaching either an inline spring or bungee cord between the antenna end insulator and the rope. Yet, despite these efforts, the antennas continued to come down. Two years ago was particularly brutal when a series of bad storms (including a tornado touching down just south of us) sent large limbs and entire trees crashing down along with my antennas.
So I spent a good bit of time this summer considering and researching alternatives. As all hams know, there is no one perfect antenna and every antennas is a compromise antenna. As a married ham, having an XYL adds an extra level of compromise – her sense of aesthetics. A vertical attached to the eaves like my friend Ed, W1YSM has, or a mighty tower and beam =like my friend John K1LYP has, were both non starters.
I eventually considered trying a ground mounted vertical antenna, complete with ground radials. Our property in Cheshire, CT, includes about 5 acres of wetland beyond our backyard which can’t be built upon. I figured that placing the antenna just beyond the edge of the yard among the trees would be help obscure it, thus making the XYL happy, and the damp ground would also contribute to making a good ground plane.
I first considered a non-resonant 43 foot vertical which seems to have been all the rage over the past decade or so among hams. However as the 43 foot vertical is non resonant on any band, it would require the use of a tuner. Most of the articles I read agreed that the optimum location of the tuner is at the base of the antenna. Such a tuner would add significant cost to the project and its something I was not familiar with.
I next considered the trapped multi-band vertical. I discussed the pros and cons with another trusted ham friend, Steve, K1SKL. Steve told me that his first antenna was a trapped vertical and he assured me it should work well if properly installed.
So after a little more reading and research, I decided to give it a try and ordered the Hustler 6BTV antenna which would get me on 10, 15, 20, 30, 40, and a narrow portion of 80 meters. At the present time (Fall 2019) the antenna alone costs $241, and once you start adding the ‘recommended’ accessories – the price adds up quickly.
In addition to the antenna itself, I purchased the following components, accessories and special tools:
- Ground Radial Plate $75
- Tilt Base Fold Over Kit $62
- Tilt Base Wing Nuts $10
- Direct Coax Feed Add On Kit: $30
- JetLube Pure Copper Anti-Seize $18
- 1000′ 14 AWG Copper Wire for ground radials $50
- Radial Plate Wire Attachment Kits (2) $18
- 200 Lawn Staples $32
- Guying Kit $34
- 4′ 4×4 pressurized wood post $13
- 50 lb sacks of Quickcrete (2) $12
- Post hole digger $37
- Bow saw for cutting down interfering nearby tree limbs $10
- 100′ LMR400 feedline $120
When you add in the miscellaneous small parts I needed (replacing hardware I damaged such as over-tightened hose clamps, I was in about $800 – wow, that equates to approximately at least a dozen over-priced pre-fabricated G5RV antennas!
Getting Started
My work on the vertical antenna installation started back in late September. I easily identified a good location about 20′ back into the wooded area behind the edge of the backyard where there was a small clearing bordered by some downed trees and rocks.
Digging the hole for the post wasn’t difficult. Using the post hole digger I bought from the Home Depot made for fairly easy work. I encountered some tricky roots along the way, but none too thick that I couldn’t hack through them. My hole ended up being about 28″ deep.
Setting the post with Quickcrete was a snap too. I started by adding about 2″ of crushed stone to the bottom of the hole for drainage and poured the Quickrete directly into the hole around the post, checking often to make sure it stayed level. Per the Quickcrete instructions I poured about a gallon and a half of water directly into the hole and again double-checked that the post remained level. The concrete set and the post was rock steady by the next morning.

Setting the post w. Quickcrete 
Radial plate installed 
50 ground radials & base
The next step was to attach the DXEngineering radial plate about 2 inches above ground using a pair of lag bolts.
The radial plate has 60 pre-drilled holes to attach ground radials and it was my intent to put in all 60. My first weekend attaching radials, I installed the first 20 radials by crimping the loop connector to the end of the copper wire on site, bolting the loop to the ground plate, and then crawling away from the post, rolling the wire spool outwards, and tacking down the radial with lawn staples as I went. This turned out to be an exhausting way to work, but it did allow me to maximize the length of each of the first 20 radials to fit the space I was installing it, stopping when I encountered a rock, a tree, or downed tree trunk.
I had read that when installing a ground based vertical antenna, the length of the radials isn’t as important as the quantity of radials. For elevated installations it is more important to have radials cut to resonance for specific bands. My first 20 radials measured anywhere from 15′ to 30′ long.
The following weekend brought sub-freezing temperatures and a nasty head cold. So I spent my antenna time working indoors preparing the next 40 radials. These I cut to 15′ in length each, crimped the loop connector, and then coiled the radial carefully so they wouldn’t become tangled. The following weekend I as able to quickly install these radials much more quickly than the first 20.
A few of my crimping jobs failed, so I ended up settling for 50 radials and I subsequently ended up pulling another 3 or 4 from the loop connector when standing on the radials near the post. Next spring I plan to revisit the radials, adding the remaining 10 and repairing any that are damaged to get back up to 60. I will then add crushed stone around the base and covering the radials in order to provide some protection.
Once I was satisfied with the radials, the next step was to attach the tilt over mount to the 4×4 using another pair of lag bolts and the pivot point bolts and lock nuts that came with the antenna. I encountered some difficulty with the one of the nylon lock nuts and ended up having to take a trip to the local hardware store for a replacement.
Assembling the antenna
The following weekend I began assembling the antenna mast in the garage. Assembly was easy enough, however I managed to over-tighten two of the hose clamps that came with the antenna, so this meant another trip to my local hardware store.

Once assembled, I carried the mast out to the base for mating. The 23′ length made it awkward to move, but it wasn’t heavy and actually felt pretty balanced in terms of weight distribution. I used a plastic lawn chair to support the top end of the mast while mating it to the base and then again when folding the antenna over for tuning.
Despite my best estimate of the space needed for the antenna to fold over, I didn’t properly account for 3 gnarly tree limbs that managed to snag the 80M whip when folding the mast over. I picked up a $10 bow saw at the Home Depot and was able to easily remedy this problem this past weekend.
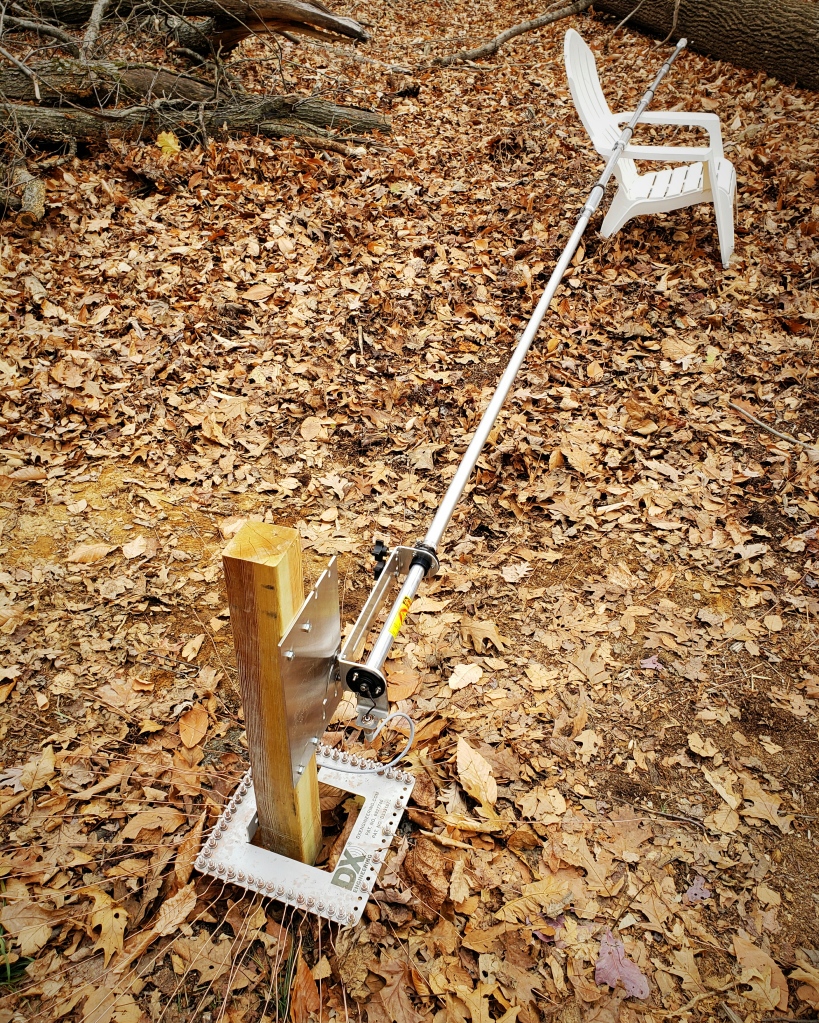
Assembled Hustler 6BTV tilted over for easy of trap tuning.
Tuning the traps
The final task was to tune the antenna for each band which is done by loosening the hose clamp at the bottom of each of the traps and sliding the trap downward a bit to adjust for a lower SWR. After each adjustment, I needed to raise the antenna again, take another reading, and then repeat the process until the antenna was in tune for that band.
I used my Rig Expert AA30 antenna analyzer and per the DXEngineering instructions, I started with the 10M band and proceeded to adjust each band in order – 10M, 15M, 20M, 30M, 40M, 80M.

SWR < 1.5 on 20 M 
SWR < 2.0 on 15 M
I was able to obtain SWR readings of under 2.0 across most of the bands, which was ‘good enough’ for me given the fact it was below freezing out this past Saturday with a forecast of snow coming. I wanted to be sure I could get on the air before winter fully set in and I planned to revisit the tuning come the warmer weather in springtime.
How does it work?
When I first tried the antenna on the air last Saturday, I was surprised to hear very few stations on 20 M and 40 M. My SWR readings taken at the radio in the shack were also much higher on all bands than observed at the antenna site. Most vexing of all was that I was getting an infinite SWR reading on 20 M! How was this possible???
I decided to not obsess and let the problem go for the night. I returned to the antenna early the next morning to recheck the tuning only to find that nearly all bands were still in tune. (30 M was a bit high in the lower portion of the band than I thought it was the previous day.)
Working logically and through a process of elimination, the next likely culprit would be the feedline. I had purchased a new 100′ run of LMR400 from Quicksilver Radio at the Nutmeg hamfest this fall I had planned to use with the new antenna, but that came up short. I connected it to my existing feedline which ran from the house, underground around the driveway and up to the berm where my previous wire antennas were located. Knowing the new LMR400 should be perfect, I decided to connect it to another 100′ run of coax to connect the antenna directly to the feed point on the house.
That seemed to do the trick.
On Air Success!
After changing out the feed line, I immediately noticed a huge difference on the air. First, there was a lot of activity on 20 M and 40 M, and the measured SWR at the rig was back down under 1.5 for both bands.
I worked KC5SCK in Georgia on 20 M who gave me a 59. My second contact on 20 M was with Belgian Special Event Station OR18TLS (HRH Princess Elisabeth’s 18th Birthday) who also gave me a 59. My next contact was with F5RAG in France who gave me a 55 signal report and my last contact that morning was on 40 M with K0BAK/VE2, a Parks On The Air activation of VE4920 in Quebec. This time my signal report was only 36.
I was relieved that the antenna was resonating and I was able to make contacts and I look forward to getting better acquainted with it in the winter months ahead.
The future and conclusion
When the weather warms next spring, I plan to revisit the installation for some touch up work. My to-do list includes replacing a few of the radials I damaged and installing the rest to get to the full planned set of 60. I also managed to bend one of the hinge bolts on the fold over base (something the instructions cautions you to be careful about) which will need to be replaced. Lastly, I will want to revisit the tuning of all bands.
Overall, this was a really fun project that consumed the better part of two months and in the end my antenna is performing as anticipated. I would recommend the Hustler trapped vertical for any ham who has the time, space and money to undertake the project. It is not a quick installation, nor is it inexpensive. But the project was manageable and even fun and the satisfaction of making contacts with an antenna I assembled can’t be beat.
Have you installed a Hustler trapped vertical? What was your experience like? Feel free to drop me a line at james@ab1dq.com.
Thanks for reading and following my blog!
73 de AB1DQ
James

Excellent post!
LikeLike
Thanks Andrew and very 73!
LikeLike
Just getting started at my end and this antenna looks like the most I could possibly get invested in, both time and money. A bit scary but I think I’ll go with this one. Thanks for your valuable post! Dave Jensen, formerly WA8VDY and hopefully getting a new license after 50 years off.
LikeLike
Hey Dave, thanks for reading my post and sharing your plans – the Hustler 6BTV was my biggest antenna project to date – it was a lot of work but a year later, it’s been all worth it. Good luck and let me know how you make out – oh, and welcome back to the hobby.
73 de AB1DQ
LikeLike
I seem to collect BTVs and upgrade them to 6BTVs. I have loaned several out and helped with installation and tuning. When I ask for them back, (normally for a special event or field day) the hams end up purchasing me a new one.
I have put them on my house, one is cut for portable use with attached grounds, and my next install is on the roof of a small garage.
If you get a good ground plane, they work great. Use the manual from DX Engineering to install. An exceptional ground may require the low band coil DX Engineering has to raise the impedance for easier tuning.
Bill N8OZV
LikeLike
Great post, James! Your situation sounds very similar to mine (XYL and all!). I have considered installing an HF vertical just inside the woods/wetlands, too; so, I found this very insightful. Perhaps this will be a guide for a future project for me.
73,
Jack WA1K
LikeLike
Hi Jack, thanks for reading and taking the time to respond. I’m very pleased with how the vertical antenna came out and it was my biggest antenna project ever – I had fun and learned a lot. 3 years later and I need to give it some renewed attention in the spring. I need to check on the condition of the radials and it could use some tweaking. If you have woods to conceal yours in, you and your XYL should be pleased…. we were. Let me know if you decide to undertake the project – I’d be happy to help if I can. 73!
LikeLike
That’s an interesting read re your Hustler antenna installation. Wish I come across it earlier a I’m partway through doing the same as you have, but with some supple changes. First, the ground mounting stub. Mine was steel, 48.5mm diameter by 7ft long. Buried into the ground 4ft of it and concreated. Yes, 3ft of pole above ground, reason being that I had also bought a Acon 12200S linear and the Acon 04AT remote controlled auto ATU which is mounted above the DXE Radial Plate. Subsequently the base of the 6-BTV is about two feet above the ground. 22 radials out currently, but I not only crimped the radial wires into the terminals, but I also soldered them afterwards. They don’t pull out as I proved when one got caught up in the sandals I was wearing while walking down the to the bottom end of the garden. After about two paces the radial wire stopped sleeping though the top of the sole and my foot and I went flying down forwards. Hurt my knee that I landed mainly on, but I now know the radial wires will not come out of the terminals LOL.
Re the coax run. I bought M&P EXTRAFLEX BURY 10 /.400″. The advantage being that it can be buried without any piping to protect it. I also at the base of the antenna put a 10 turn 6” diameter air spaced choke coil about 6” away from the A/E base on the coax the takes the RF from the remote auto ATU. That was fun making that! When I got to the concrete patio, there was no way I was going to chisel a two-inch-deep trench (hard work to do that) so used som2” dia. pond tubbing to get the main station earthing rod (7ft down) where it goes through a lightening protector and into the house. In the house I put another choke in, but it was not one I made but an MFJ-915 that I had laying around. I’m now just at the start of doing the trap tuning. I would be interested to know what your VSWR was for each band if you have a note of them? I also have a Rig Expert AA35 Zoom with which I used a 6ft length coax to the A/E base as recommended by DXE. The lowest VSWR I could get was 1.7 on the 10m trap, which Id have liked to get lower.
Any a bit long this but as I mentioned earlier, would love to know how lower VSWR’s you managed to get on all the traps.
Vince Bobin G1FBH
LikeLike